Skip to content

Installation of Mediation Controller servers

Note

As a reminder, switching to root on Debian machines must be done with the following command:

1
su -

The instructions given on this page should be replicated on both Mediation Controller servers, starting with the MASTER server first.
When differences appear between the MASTER and SLAVE servers, they will be highlighted. If there is no mention of this, then the instructions apply to both MASTER and SLAVE servers.

System settings

Connection to the machine

By default, there are two accounts on virtual appliances: a user account and a super-user account.

  • User account
    • Login : systancia
    • Password: systnci
  • Super-user account
    • Login : root
    • Password: systnci

Connect to the machine in console mode.

Note

The default keyboard layout is QWERTY.

Changing the keyboard layout

You can change the keyboard layout with the following command line:

1
dpkg-reconfigure keyboard-configuration

A menu appears to allow you to choose another keyboard layout.

Then use the following command line to apply and save the settings:

1
setupcon -k --save

The settings will take effect immediately after this command is executed.

Configuration of the network

It is essential to configure a static network address for the Mediation Controller. To do this, you first need to retrieve the name of your machine's network interface. Run the following command as root:

1
ip -br a | grep -ve "^lo"

This command displays the name of the network interface, its status, and the IP addresses assigned to the interface.

??? example “Example” After the command is executed, the following output is displayed:

1
2
3
4
5
```
ens192           UP             172.16.0.23/20 172.16.0.27/32 172.16.0.28/32 172.16.0.29/32 172.16.0.24/20
```

The name of the network interface is `ens192`.

Once the network interface name has been obtained, it is now possible to edit the machine's network configuration.
Edit the /etc/network/interfaces file to modify it using the following template:

 1
 2
 3
 4
 5
 6
 7
 8
 9
10
11
12
13
14
15
16
17
18
19
20
21
22
23
# This file describes the network interfaces available on your system
# and how to activate them. For more information, see interfaces(5).

source /etc/network/interfaces.d/*

# The loopback network interface
auto lo
iface lo inet loopback

# The primary network interface
auto INTERFACE_NAME
iface INTERFACE_NAME inet static
    address RIP_MED_WEB_MASTER
    netmask NETMASK
    gateway NETWORK_GATEWAY
    dns-nameservers IP_DNS_1 IP_DNS_2
    dns-search DNS_SUFFIX

# The secondary network interface
auto INTERFACE_NAME:1
iface INTERFACE_NAME:1 inet static
    address RIP_MED_SSL_MASTER
    netmask NETMASK

Where:

  • INTERFACE_NAME must be replaced by the name of the network interface previously retrieved.
  • RIP_MED_WEB_MASTER must be replaced by the server's main real IP address, which will be the IP address through which the web consoles can be accessed.
  • NETMASK must be replaced by the network mask associated with the IP address.
  • NETWORK_GATEWAY must be replaced by the default network gateway.
  • IP_DNS must be replaced by the IP address of the DNS server. If several servers need to be configured (3 maximum), separate them with a space.
  • DNS_SUFFIX must be replaced by the DNS suffix to be used. If no suffix needs to be entered, delete the line.
  • RIP_MED_SSL_MASTER must be replaced by the secondary real IP address of the server. This will be the IP address through which the SSL Router will be accessible.

??? example “Example”

 1
 2
 3
 4
 5
 6
 7
 8
 9
10
11
12
13
14
15
16
17
18
19
20
21
22
23
# This file describes the network interfaces available on your system
# and how to activate them. For more information, see interfaces(5).

source /etc/network/interfaces.d/*

# The loopback network interface
auto lo
iface lo inet loopback

# The primary network interface
auto eth0
iface eth0 inet static
    address 10.0.10.10
    netmask 255.255.255.0
    gateway 10.0.10.254
    dns-nameservers 10.0.10.100 10.0.10.101
    dns-search domain.local

# The secondary network interface
auto eth0:1
iface eth0:1 inet static
    address 10.0.10.11
    netmask 255.255.255.0

Finally, all that remains is to restart the networking service in order to load the new network configuration:

1
systemctl restart networking

It is essential to configure a static network address for the Mediation Controller. To do this, you first need to retrieve the name of your machine's network interface. Run the following command as root:

1
ip -br a | grep -ve "^lo"

This command displays the name of the network interface, its status, and the IP addresses assigned to the interface.

??? example “Example” After the command is executed, the following output is displayed:

1
2
3
4
5
```
ens192           UP             172.16.0.25/20 172.16.0.27/32 172.16.0.28/32 172.16.0.29/32 172.16.0.26/20
```

The name of the network interface is `ens192`.

Once the network interface name has been obtained, it is now possible to edit the machine's network configuration.
Edit the /etc/network/interfaces file to modify it using the following template:

 1
 2
 3
 4
 5
 6
 7
 8
 9
10
11
12
13
14
15
16
17
18
19
20
21
22
23
# This file describes the network interfaces available on your system
# and how to activate them. For more information, see interfaces(5).

source /etc/network/interfaces.d/*

# The loopback network interface
auto lo
iface lo inet loopback

# The primary network interface
auto INTERFACE_NAME
iface INTERFACE_NAME inet static
    address RIP_MED_WEB_SLAVE
    netmask NETMASK
    gateway NETWORK_GATEWAY
    dns-nameservers IP_DNS_1 IP_DNS_2
    dns-search DNS_SUFFIX

# The secondary network interface
auto INTERFACE_NAME:1
iface INTERFACE_NAME:1 inet static
    address RIP_MED_SSL_SLAVE
    netmask NETMASK

Where:

  • INTERFACE_NAME must be replaced by the name of the network interface previously retrieved.
  • RIP_MED_WEB_SLAVE must be replaced by the server's main real IP address, which will be the IP address through which the web consoles can be accessed.
  • NETMASK must be replaced by the network mask associated with the IP address.
  • NETWORK_GATEWAY must be replaced by the default network gateway.
  • IP_DNS must be replaced by the IP address of the DNS server. If several servers need to be configured (3 maximum), separate them with a space.
  • DNS_SUFFIX must be replaced by the DNS suffix to be used. If no suffix needs to be entered, delete the line.
  • RIP_MED_SSL_SLAVE must be replaced by the secondary real IP address of the server. This will be the IP address through which the SSL Router will be accessible.

??? example “Example”

 1
 2
 3
 4
 5
 6
 7
 8
 9
10
11
12
13
14
15
16
17
18
19
20
21
22
23
# This file describes the network interfaces available on your system
# and how to activate them. For more information, see interfaces(5).

source /etc/network/interfaces.d/*

# The loopback network interface
auto lo
iface lo inet loopback

# The primary network interface
auto eth0
iface eth0 inet static
    address 10.0.10.12
    netmask 255.255.255.0
    gateway 10.0.10.254
    dns-nameservers 10.0.10.100 10.0.10.101
    dns-search domain.local

# The secondary network interface
auto eth0:1
iface eth0:1 inet static
    address 10.0.10.13
    netmask 255.255.255.0

Finally, all that remains is to restart the networking service in order to load the new network configuration:

1
systemctl restart networking

Tip

Now that the network settings have been applied, the server can be accessed via SSH.

Changing local account passwords

Systancia strongly recommends changing the password for these accounts once the virtual appliance has been deployed.

Use the following command and enter the new password for the systancia standard account:

1
passwd systancia

Then repeat the operation for the root super-user account:

1
passwd root

Configuring the machine name

You can change the server name by configuring the server's hostname and hosts files.

Edit the /etc/hostname file to specify the machine name.
The product needs the new name for another location, so a copy of the previous file must be made using the following command:

1
cp /etc/hostname /var/ipdiva/zopeChroot/etc/hostname

It is necessary to replicate the /etc/hosts file configuration in relation to the machine's actual primary IP address (RIP_MED_WEB_MASTER).
To do this, edit the /etc/hosts file and check that the second line is in the following format:

2
RIP_MED_WEB_MASTER  FQDN    MACHINE_NAME
Example

If the machine is named MEDIATION-CONTROLLER-MASTER without belonging to a domain and its RIP_MED_WEB_MASTER real IP address is 10.0.10.10, then the file would be completed as follows:

2
10.0.10.10  MEDIATION-CONTROLLER-MASTER

If the machine belongs to the DOMAIN.LOCAL domain, then the file would be completed as follows:

2
10.0.10.10  MEDIATION-CONTROLLER-MASTER.DOMAIN.LOCAL   MEDIATION-CONTROLLER-MASTER

It is necessary to replicate the /etc/hosts file configuration in relation to the machine's actual primary IP address (RIP_MED_WEB_SLAVE).
To do this, edit the /etc/hosts file and check that the second line is in the following format:

2
RIP_MED_WEB_SLAVE  FQDN    MACHINE_NAME
Example

If the machine is named MEDIATION-CONTROLLER-SLAVE without belonging to a domain and its RIP_MED_WEB_SLAVE real IP address is 10.0.10.12, then the file would be completed as follows:

2
10.0.10.12  MEDIATION-CONTROLLER-SLAVE

If the machine belongs to the DOMAIN.LOCAL domain, then the file would be completed as follows:

2
10.0.10.12  MEDIATION-CONTROLLER-SLAVE.DOMAIN.LOCAL   MEDIATION-CONTROLLER-SLAVE

To apply the new configuration, restart the server:

1
reboot

Time zone modification

By default, the virtual appliance is set to the Europe/Paris time zone.

To change this time zone, first use the following command to retrieve the syntax of available time zones:

1
timedatectl list-timezones

Then use the following command line:

1
timedatectl set-timezone your_time_zone
Example

To set the time zone to London, the following command must be executed:

1
timedatectl set-timezone Europe/London

Check the server's time zone using the following command line:

1
timedatectl

Initializing the Mediation Controller server

Initializing the Mediation Controller server

The Mediation Controller server is initialized using a configuration script. This script reconfigures the cluster's IP addresses in the product's various services and pre-configures the settings required for an HTML5 Gateway to function.
Run it via the following command line as root:

1
/opt/systancia/initializeCluster

The script will ask you to enter the following information:

  • IP VIP HTTPS: virtual web IP address of the cluster, which is VIP_MED_WEB.
  • IP VIP SSL: virtual SSL IP address of the cluster, which is VIP_MED_SSL.
  • IP VIP ZIO: virtual IP address for the SLAVE Mediation Controller server connection to the internal configuration database of the MASTER server, which is VIP_MED_ZEO.
  • IP Master HTTPS: The real web IP address of the MASTER Mediation Controller server, which is RIP_MED_WEB_MASTER.
  • IP Master SSL: The real IP address for the SSL router of the MASTER Mediation Controller server, which is RIP_MED_SSL_MASTER.
  • IP Slave HTTPS: The real web IP address of the SLAVE Mediation Controller server, which is RIP_MED_WEB_SLAVE.
  • IP Slave SSL: The real IP address for the SSL router of the SLAVE Mediation Controller server, which is RIP_MED_SSL_SLAVE.
  • HTML5 port: local listening port for redirecting access to the HTML5 Gateway service; we recommend entering the port 1234.
  • Gateway: name of the Edge Gateway; enter the name of the first Edge Gateway.
  • Organization: name of the organization to which the Edge Gateways and HTML5 Gateways will connect.

Once initialization is complete, restart the server:

1
reboot

Changing the password of the cyberelements Gate /mediation/system console

At this stage of the installation, a new administration interface is available: Change password

Applying licenses and certificates

Still in the /mediation/system console, you will need to enter the certificates and licenses for the Mediation Controller server.

Attention!

The SSL Router license and certificate are specific to the MASTER or SLAVE Mediation Controller server.
Configuring the wrong license or certificate will cause malfunctions later on.

Apply the license and certificate for the SSL Router component:
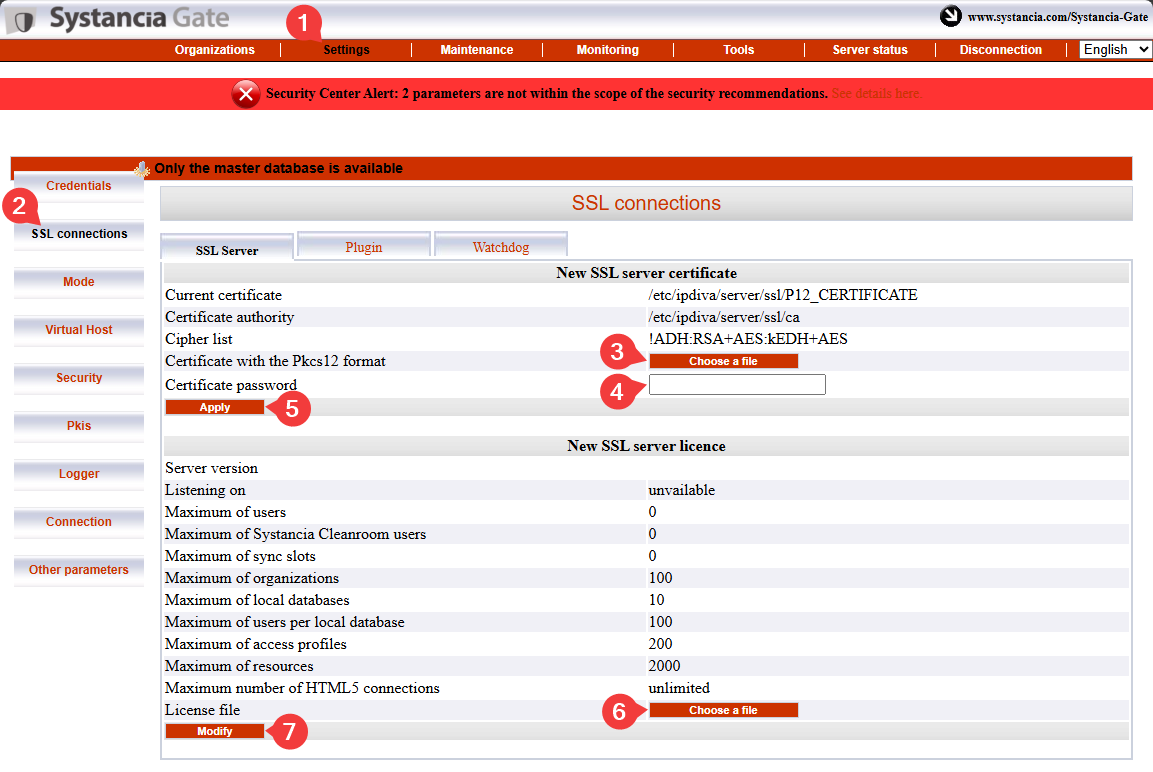
  1. Click the Settings tab.
  2. Select SSL Connections from the menu.
  3. Search for the certificate for the SSL Router.
  4. Enter the password for the SSL Router certificate.
  5. Click Apply to apply the certificate to the SSL router.
  6. Select the server license file.
  7. Click Modify to apply the server license.

Next, enter the certificate information for the cyberelements Cleanroom client:
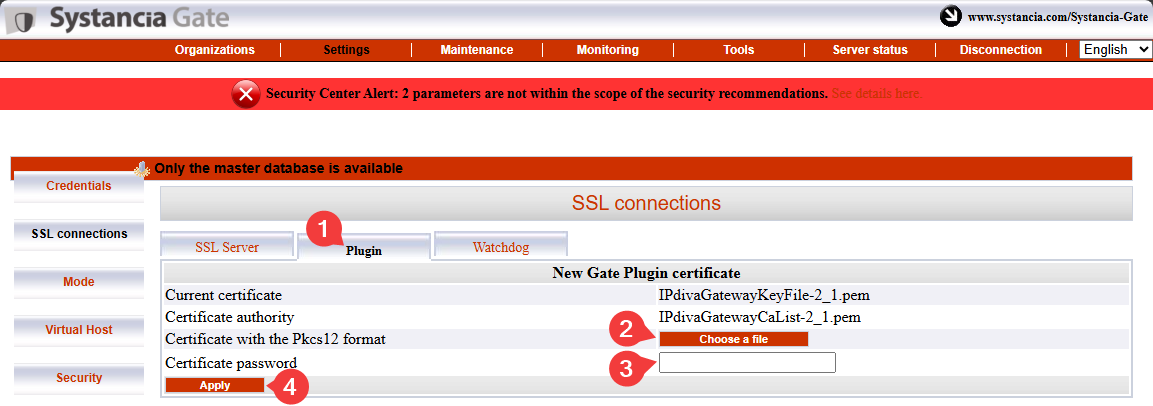
  1. Select the Plugin tab.
  2. Search for the cyberelements Cleanroom client certificate.
  3. Enter the certificate password.
  4. Click Apply to apply the certificate.

You still need to enter the information for the Watchdog certificate:
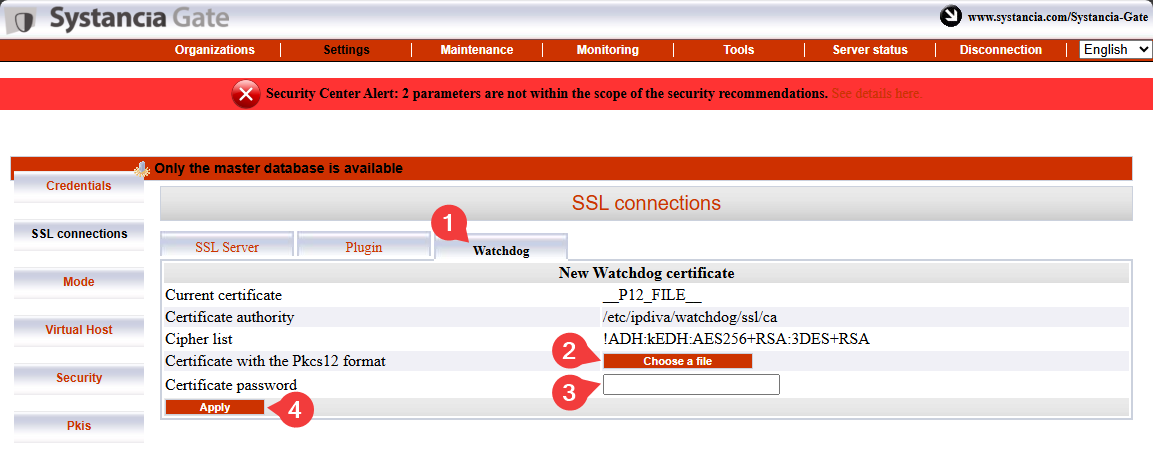
  1. Select the Watchdog tab
  2. Search for the Watchdog certificate.
  3. Enter the certificate password.
  4. Click Apply to apply the certificate.

For these changes to take effect, you need to restart the SSL Router and the Watchdog:

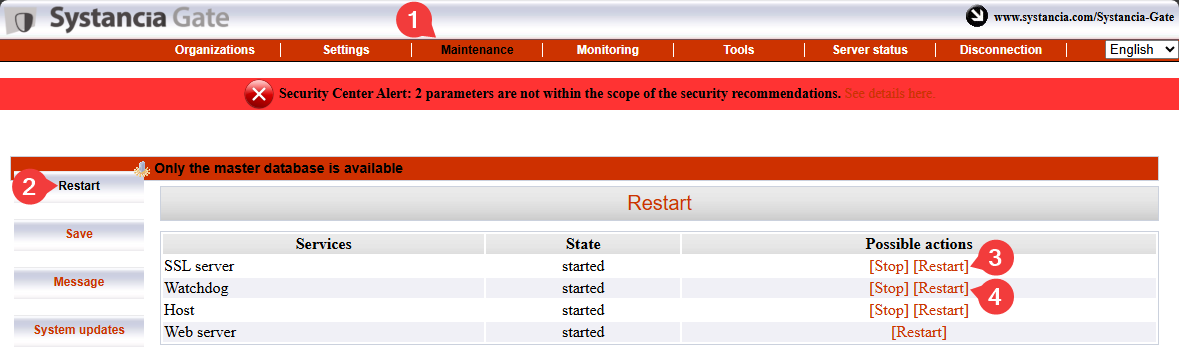
Mediation Controller Server Pairing

Attention!

By this point, both Mediation Controller servers must have been configured up to the application of licenses and certificates.
If the SLAVE Mediation Controller server has not yet been configured, please do so by starting from the beginning of this documentation (#installation-of-mediation-controller-servers).

The Mediation Controller server pairing step will establish a trusted link between the two servers and initialize the cluster operation.

On the SLAVE Mediation Controller server

Run the following command as root to initiate a pairing request with the MASTER Mediation Controller server:

1
hostManagerCtl bootstrap RIP_MED_WEB_MASTER

Replace RIP_MED_WEB_MASTER with the relevant IP address.

??? example “Example” If RIP_MED_WEB_MASTER is equal to 10.0.10.10, then the command to enter is as follows:

1
2
3
```bash
hostManagerCtl bootstrap 10.0.10.10
```

On the MASTER Mediation Controller server

Run the following command as root to check for pending pairing requests and retrieve the request ID:

1
hostManagerCtl getPendingRequests

Next, run the following command to accept the pairing request, replacing ID with the ID retrieved from the previous command:

1
hostManagerCtl acceptRequest ID

??? example “Example” If the return value of the hostManagerCtl getPendingRequests command is as follows:

 1
 2
 3
 4
 5
 6
 7
 8
 9
10
11
```
                  id          name      url
===============================================================
900elffl744ph7vpn6kepiswdh1rncd73            slave      https://10.0.10.12:9060/
```

So the command to accept the pairing request is as follows:

```bash
hostManagerCtl acceptRequest 900elffl744ph7vpn6kepiswdh1rncd73            
```

To verify the association, use the following command on the Mediation Controller server (either MASTER or SLAVE):

1
hostManagerCtl listPeers

The result will differ depending on the server on which the command is executed:

The expected result on the MASTER Mediation Controller server is as follows:

1
slave -> RIP_MED_WEB_SLAVE

??? example “Example”

1
slave -> 10.0.10.12

The expected result on the SLAVE Mediation Controller server is as follows:

1
master -> RIP_MED_WEB_MASTER

??? example “Example”

1
master -> 10.0.10.10

On the SLAVE Mediation Controller server

You can check the bootstrap status from the SLAVE server using the following command:

1
hostManagerCtl getBootstrapStatus

A cluster that is not experiencing any synchronization issues will return the value 0.

A final series of commands is required, again on the SLAVE server, to synchronize a secret shared between both Mediation Controllers:

1
2
hostManagerCtl masterSynchro /etc/ipdiva/secure/secret /etc/ipdiva/secure/secret
systemctl restart apache2
What is the purpose of the inter-server connection?

This is a special connection for cluster operation that allows a Mediation Controller server to route traffic to another Mediation Controller server in cases where the target Edge Gateway is not connected to the first server but only to the second.

For example, if the MASTER Mediation Controller server is no longer connected to the Edge Gateway, it can use the interserver link to reach the Edge Gateway via the SLAVE Mediation Controller server.

flowchart LR
    MASTER(Mediation Controller<br/>MASTER) --x |Connection lost| GW(Edge Gateway)
    MASTER --> |Interserver link| SLAVE(Mediation Controller<br/>SLAVE) --> GW
Hold "Ctrl" to enable pan & zoom

On the MASTER Mediation Controller server

Edit the /etc/ipdiva/server/remoteServers.xml file to indicate the CN of the interserver certificate:

1
2
3
4
5
6
7
8
9
<remoteConfig>
        <!-- allowed CNs can be specified as a semi-colon separed list, by default
                all CNs are allowed
         -->
        <localCluster allowed-cns='SLAVECN'>
                <!-- this example uses the listening certificate, so it MUST have the CLIENT role
                     to be usable
                        <remoteServer connect="192.168.0.123:443:ssl"/>
                -->

Replace SLAVECN with the CN of the certificate intended for the interserver connection.
If you do not know the CN of the interserver certificate, then the character * can be entered (u recommended if in doubt):

1
2
3
4
5
6
7
8
9
<remoteConfig>
        <!-- allowed CNs can be specified as a semi-colon separed list, by default
                all CNs are allowed
         -->
        <localCluster allowed-cns='*'>
                <!-- this example uses the listening certificate, so it MUST have the CLIENT role
                     to be usable
                        <remoteServer connect="192.168.0.123:443:ssl"/>
                -->

??? example “Example” Taking into account the following information:

 1
 2
 3
 4
 5
 6
 7
 8
 9
10
11
12
13
14
15
16
17
18
19
20
21
22
23
24
25
26
27
28
29
30
31
32
33
34
35
36
37
38
39
40
41
42
43
44
45
46
47
48
49
50
51
52
53
54
55
56
57
58
59
60
61
62
63
64
65
66
67
68
69
70
71
72
73
74
75
76
77
78
79
80
81
- Interserver certificate CN: `my-interserver-cert`

The `/etc/ipdiva/server/remoteServers.xml` file on the Mediation Controller `MASTER` server would be completed as follows:

```xml hl_lines="5"
<remoteConfig>
        <!-- allowed CNs can be specified as a semi-colon separed list, by default
                all CNs are allowed
         -->
        <localCluster allowed-cns='my-interserver-cert'>
                <!-- this example uses the listening certificate, so it MUST have the CLIENT role
                     to be usable
                        <remoteServer connect="192.168.0.123:443:ssl"/>
                -->
```

??? example "Complete file"
    ```xml hl_lines="5"
    <remoteConfig>
            <!-- allowed CNs can be specified as a semi-colon separed list, by default
                    all CNs are allowed
             -->
            <localCluster allowed-cns='interserver-documentation-cluster'>
                    <!-- this example uses the listening certificate, so it MUST have the CLIENT role
                         to be usable
                            <remoteServer connect="192.168.0.123:443:ssl"/>
                    -->

                    <!-- in this example we use a custom certificate, it MUST have the CLIENT role
                         to be usable
                            <remoteServer connect="192.168.0.123:443:ssl">
                                    <cert>/etc/ipdiva/server/ssl/interserver.p12</cert>
                    <password>s3cr3t</password>
                    <ca-dir>/etc/ipdiva/server/ssl/ca</ca-dir>
                    <crl-dir>/etc/ipdiva/server/ssl/crl</crl-dir>
                                    <min-version>tls1.3</min-version>
                                    <max-version></max-version>
                                    <cipherlist>!ADH:RSA+AES:kEDH+AES</cipherlist>
                                    <cipherlist-tls1.3>TLS_CHACHA20_POLY1305_SHA256:TLS_AES_256_GCM_SHA384:TLS_AES_128_GCM_SHA256</cipherlist-tls1.3>
                    <use-cn>no</use-cn>
                    <verify-cert>true</verify-cert>
                    <verify-certhostnamematch>true</verify-certhostnamematch>
                    <cert-peername>MASTERCN</cert-peername>
                            </remoteServer>
                    -->
            </localCluster>

            <!--
                    Intersites connections
            -->
            <intersites localSiteName='localSite1'>
                    <!-- An accepted remote connection
                            name : the name of the accepted remote site
                            password : the associated password
                            pattern : a list of pattern of allowed peers for this remote site (separated by ;)
                    -->
                    <!-- <accept name='david-desktop' password='passwd' pattern='S:[^@]+@ipdiva'/> -->

                    <!-- A connection to a remote site
                            name : is the name of the remoteSite
                            password : the password to use to connect
                            pattern : a list of pattern (regex) of the gateway that could be addressed via this link (separated by ;)
                            connect : a connection URL

                            the body can contain traditional TlsData parameters:
                                <cert>file.p12</cert>
                                <password>....</password>
                                <cadir>....</cadir>
                    -->
                    <!--
                            <remoteSite name='remoteSiteName'
                                            password='mypass'
                                            pattern='S:gw1@ipdiva;S:gw2@ipdiva'
                                            connect="192.168.0.168:9002" />
                    -->
            </intersites>


    </remoteConfig>
    ```

On the SLAVE Mediation Controller server

Send the interserver certificate to the SLAVE Mediation Controller in the /tmp/ directory.
Next, run the following commands as root to move it to the target directory with the appropriate permissions:

1
2
3
mv /tmp/*.p12 /etc/ipdiva/server/ssl/
chown root:ipdivasrv /etc/ipdiva/server/ssl/*.p12
chmod 640 /etc/ipdiva/server/ssl/*.p12

Next, edit the /etc/ipdiva/server/remoteServers.xml file to add the following content to the <remoteConfig> tag (the old <localCluster> tag can be deleted entirely):

 5
 6
 7
 8
 9
10
11
12
13
14
15
16
17
<localCluster allowed-cns='MASTERCN'>
    <remoteServer connect="RIP_MED_SSL_MASTER:PORT_RIP_MED_SSL_MASTER:ssl">
        <cert>/etc/ipdiva/server/ssl/INTERSERVER.P12</cert>
        <password>PASSWORD</password>
        <ca-dir>/etc/ipdiva/server/ssl/ca</ca-dir>
        <crl-dir>/etc/ipdiva/server/ssl/crl</crl-dir>
        <cipherlist>!ADH:RSA+AES:kEDH+AES</cipherlist>
        <use-cn>no</use-cn>
        <verify-cert>true</verify-cert>
        <verify-certhostnamematch>true</verify-certhostnamematch>
        <cert-peername>MASTERCN</cert-peername>
    </remoteServer>
</localCluster>

Replace:

  • MASTERCN: specify the CN of the SSL Router certificate of the MASTER Mediation Controller, which is usually RIP_MED_SSL_MASTER.
  • RIP_MED_SSL_MASTER: corresponds to the secondary IP address of the MASTER Mediation Controller.
  • PORT_RIP_MED_SSL_MASTER: this is the port listened to by the SSL router of the MASTER Mediation Controller; it is usually 443.
  • INTERSERVER.P12: name of the certificate intended for the interserver.
  • PASSWORD: interserver certificate password.

??? example “Example” Taking into account the following information:

 1
 2
 3
 4
 5
 6
 7
 8
 9
10
11
12
13
14
15
16
17
18
19
20
21
22
23
24
25
26
27
28
29
30
31
32
33
34
35
36
37
38
39
40
41
42
43
44
45
46
47
48
49
50
51
52
53
54
55
56
57
58
59
60
61
62
63
64
65
66
67
68
69
70
71
72
73
74
75
76
77
78
- Interserver certificate name: `my-interserver-cert.p12`
- Interserver certificate password: `MySecurePassword`
- RIP SSL of the Mediation Controller `MASTER`: `10.0.10.11`
- Port on the SSL RIP of the Mediation Controller `MASTER`: `443`
- CN of the Mediation Controller `MASTER` certificate: `10.0.10.11`

The `/etc/ipdiva/server/remoteServers.xml` file on the Mediation Controller `SLAVE` server would be completed as follows:

```xml linenums="5"
<localCluster allowed-cns='10.0.10.11'>
    <remoteServer connect="10.0.10.11:443:ssl">
        <cert>/etc/ipdiva/server/ssl/my-interserver-cert.p12</cert>
        <password>MySecurePassword</password>
        <ca-dir>/etc/ipdiva/server/ssl/ca</ca-dir>
        <crl-dir>/etc/ipdiva/server/ssl/crl</crl-dir>
        <cipherlist>!ADH:RSA+AES:kEDH+AES</cipherlist>
        <use-cn>no</use-cn>
        <verify-cert>true</verify-cert>
        <verify-certhostnamematch>true</verify-certhostnamematch>
        <cert-peername>10.0.10.11</cert-peername>
    </remoteServer>
</localCluster>
```

??? example "Complete file"
    ```xml
    <remoteConfig>
            <!-- allowed CNs can be specified as a semi-colon separed list, by default
                    all CNs are allowed
             -->
            <localCluster allowed-cns='10.0.10.11'>
                <remoteServer connect="10.0.10.11:443:ssl">
                    <cert>/etc/ipdiva/server/ssl/my-interserver-cert.p12</cert>
                    <password>MySecurePassword</password>
                    <ca-dir>/etc/ipdiva/server/ssl/ca</ca-dir>
                    <crl-dir>/etc/ipdiva/server/ssl/crl</crl-dir>
                    <cipherlist>!ADH:RSA+AES:kEDH+AES</cipherlist>
                    <use-cn>no</use-cn>
                    <verify-cert>true</verify-cert>
                    <verify-certhostnamematch>true</verify-certhostnamematch>
                    <cert-peername>10.0.10.11</cert-peername>
                </remoteServer>
            </localCluster>

            <!--
                    Intersites connections
            -->
            <intersites localSiteName='localSite1'>
                    <!-- An accepted remote connection
                            name : the name of the accepted remote site
                            password : the associated password
                            pattern : a list of pattern of allowed peers for this remote site (separated by ;)
                    -->
                    <!-- <accept name='david-desktop' password='passwd' pattern='S:[^@]+@ipdiva'/> -->

                    <!-- A connection to a remote site
                            name : is the name of the remoteSite
                            password : the password to use to connect
                            pattern : a list of pattern (regex) of the gateway that could be addressed via this link (separated by ;)
                            connect : a connection URL

                            the body can contain traditional TlsData parameters:
                                <cert>file.p12</cert>
                                <password>....</password>
                                <cadir>....</cadir>
                    -->
                    <!--
                            <remoteSite name='remoteSiteName'
                                            password='mypass'
                                            pattern='S:gw1@ipdiva;S:gw2@ipdiva'
                                            connect="192.168.0.168:9002" />
                    -->
            </intersites>


    </remoteConfig>
    ```

Modify the configuration of the SLAVE SSL router by running the following command:

1
sed -i '8i\\t<network-id>1</network-id>' /etc/ipdiva/server/server.xml

On the MASTER and SLAVE Mediation Controller servers

Restart the SSL Router to apply the interserver link settings:

1
/usr/local/ipdiva/server/bin/restart

To confirm that the interserver link is working properly, the following command should return a result:

1
grep floodWithLocalInfos /var/log/IPdivaServer.log

The previous command should produce a log containing the following: TRACE Router.floodWithLocalInfos sent 0 peer(s), 0 foreignPeers, and 0 multicast group(s).
If no such log is displayed, check the configuration set up in this chapter.

In the /mediation/system web console of the MASTER Mediation Controller

Enable the inter-server connection between the two Mediation Controllers by editing the default SSL virtual host:

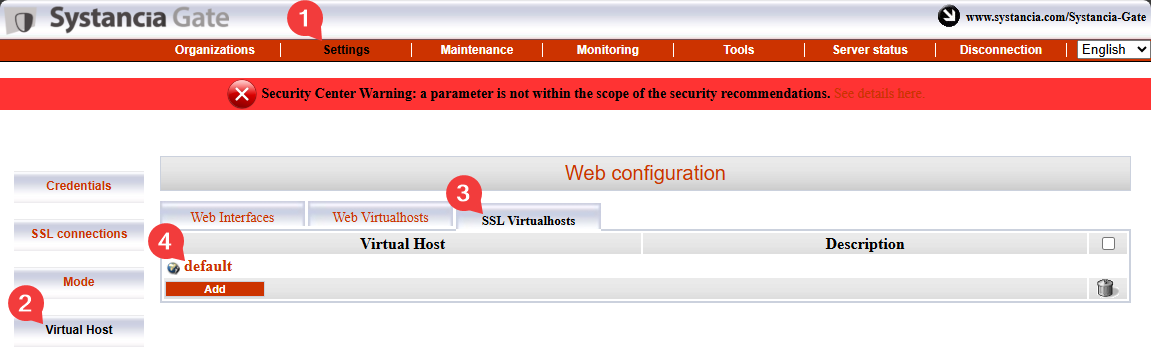
Fill in the various fields using the instructions below and enable the cross-server linking feature by checking the box labeled Is cross-server linking configured?:

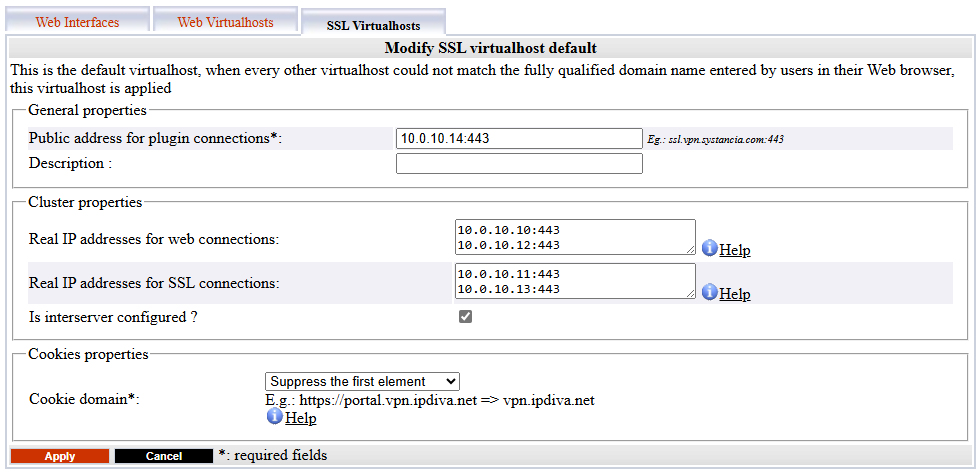
  • Public address for plugin connections: corresponds to VIP_MED_SSL followed by its listening port (usually 443).
  • Actual public IP addresses for web connections: corresponds to the pair of actual web IP addresses (RIP_MED_WEB_MASTER and RIP_MED_WEB_SLAVE) with their corresponding ports, one line per IP address and port pair.
  • Actual public IP addresses for SSL connections: corresponds to the actual SSL IP address pair (RIP_MED_SSL_MASTER and RIP_MED_SSL_SLAVE) with their corresponding ports, one line per IP address and port pair.

Initializing cyberelements Cleanroom

Connecting to the PostgreSQL database

To function, cyberelements Cleanroom requires the use of an external PostgreSQL database (DB) to store its settings and various logs in the /system console.
If the DB is directly accessible from the Mediation Controller servers, proceed directly to the DB initialization step.

Connecting to a database on the LAN

In order to enable connection to a database located on the LAN without opening a DMZ to LAN flow, the database flow will be redirected through a TLS tunnel between the Edge Gateways and the Mediation Controllers.
To achieve this, it is necessary to configure one Edge Gateway (or two Edge Gateways) using the underlying cyberelements Gate technology.

Declaration of cyberelements Gate Edge Gateways

To do this, start by logging in to the /mediation/system console in cyberelements Gate.

Then go to the “Organizations” menu and click “Add”:

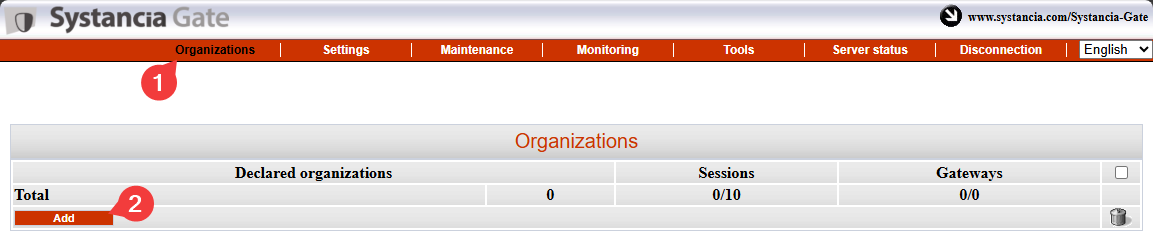
Enter the organization name, which must be different from the one assigned to cyberelements Cleanroom (for example, tunnel), and specify at least one user session license along with the password for the admin account:

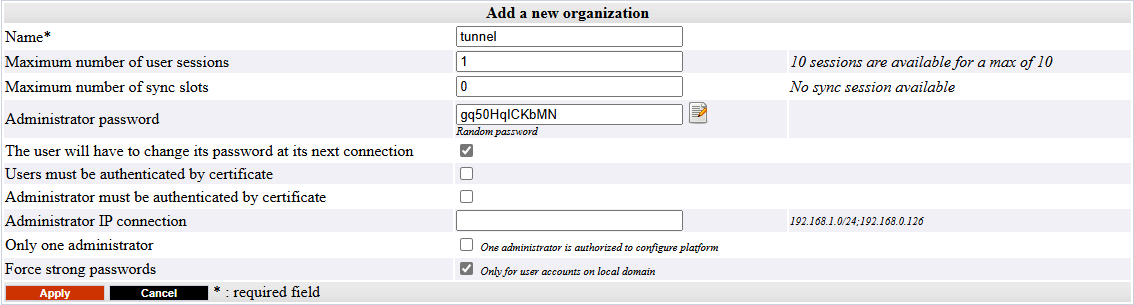
Log in to the administration interface of the organization you created earlier using the admin account by going to /gate/admin:

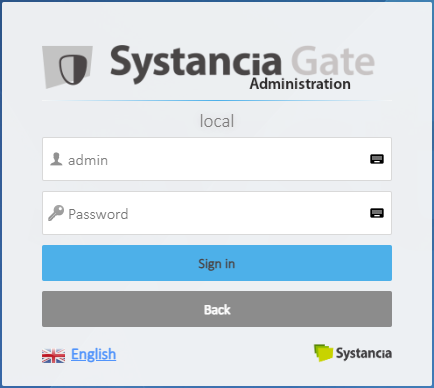
Then declare both Edge Gateways that will be used to set up the tunnel.
On the left, hover over Infrastructure, click Gateways, and then click the Add button:

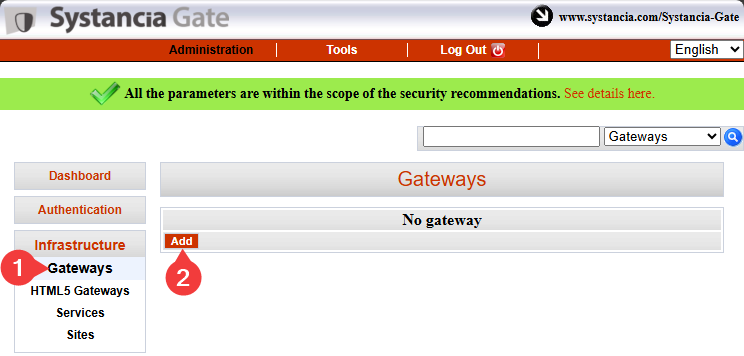
Enter the name of the first Edge Gateway and confirm the entry:

Information

As a reminder, the name of an Edge Gateway is linked to the certificate it will use to authenticate itself with the SSL Router of the Mediation Controller.
This name takes the following form <GW_NAME>@<ORGANIZATION_NAME>, where <GW_NAME> corresponds to the name of the Edge Gateway and where <ORGANIZATION_NAME> corresponds to the organization name created in the cyberelements Gate system console.

Repeat the Edge Gateway declaration step for the second Edge Gateway.

Tunnel connections and settings on Edge Gateways

Information

The following steps can be replicated on both Edge Gateways used for the tunnel to access the database.

!!! warning “Prerequisites” To complete this part, you will need to use either:

1
2
- [A virtual Edge Gateway appliance](/CYE/Install/Cluster/FromAppliances/InstallClusterFromAppliances-InstallEdgeGateway.md#parametrages-initiaux-sur-le-systeme){target="_blank"} for which only the system initialization has been performed.
- [An Edge Gateway installed from scratch](/CYE/Install/Cluster/FromScratch/InstallClusterFromScratch-InstallEdgeGateway.md){target="_blank"} with the Edge Gateway components installed.

First, use a tool such as WinSCP or FileZilla to transfer the certificate required for the connection to the /tmp/ directory on the Edge Gateway via SCP.

Then connect via SSH and switch to root.

To connect the Edge Gateway to both Mediation Controllers, you need to create two new Edge Gateway instances: one will connect to the MASTER Mediation Controller, while the other will connect to the SLAVE Mediation Controller.
To create them, run the following commands:

1
2
/usr/local/ipdiva/gateway/bin/gatewayCloner -tunnel-master
/usr/local/ipdiva/gateway/bin/gatewayCloner -tunnel-slave

Copy the certificate file to the /etc/ipdiva/gateway-tunnel-master/ssl/ and /etc/ipdiva/gateway-tunnel-slave/ssl/ directories:

1
2
cp /tmp/<CERT_NAME> /etc/ipdiva/gateway-tunnel-master/ssl/
cp /tmp/<CERT_NAME> /etc/ipdiva/gateway-tunnel-slave/ssl/

Replace <CERT_NAME> with the name of the certificate that the Edge Gateway must use to connect to the Mediation Controller.

Configure the Edge Gateway instances to allow them to connect to the Mediation Controllers.
The configurations differ depending on the Mediation Controller to be contacted. Perform both settings:

Edit the file /etc/ipdiva/gateway-tunnel-master/gateway.xml and complete it using the following information (several sections have been omitted and are indicated by […]):

 1
 2
 3
 4
 5
 6
 7
 8
 9
10
11
12
<gateway>
    <server>@SERVER@:@SERVERPORT@:ssl</server>
[…]
    <ssl>
        <cert>/etc/ipdiva/gateway-tunnel-master/ssl/keyfile.pem</cert>
        <password>PASSWORD</password>
[…]
    </ssl>
[…]
    <rpc-listen>127.0.0.1:@RPC_PORT@</rpc-listen>
[…]
</gateway>

Replace the following elements:

  • @SERVER@: must be replaced with the RIP_MED_SSL_MASTER address
  • @SERVERPORT@: must be replaced with the SSL router's listening port, normally set to 443
  • keyfile.pem: must be replaced with the name of the certificate file
  • PASSWORD: must be replaced with the certificate password
  • @RPC_PORT@: must be replaced with a port that is not currently listening on the machine; port 9082 can be used

??? example “Example” Taking into account the following information:

  1
  2
  3
  4
  5
  6
  7
  8
  9
 10
 11
 12
 13
 14
 15
 16
 17
 18
 19
 20
 21
 22
 23
 24
 25
 26
 27
 28
 29
 30
 31
 32
 33
 34
 35
 36
 37
 38
 39
 40
 41
 42
 43
 44
 45
 46
 47
 48
 49
 50
 51
 52
 53
 54
 55
 56
 57
 58
 59
 60
 61
 62
 63
 64
 65
 66
 67
 68
 69
 70
 71
 72
 73
 74
 75
 76
 77
 78
 79
 80
 81
 82
 83
 84
 85
 86
 87
 88
 89
 90
 91
 92
 93
 94
 95
 96
 97
 98
 99
100
101
102
103
104
105
106
- `RIP_MED_SSL_MASTER` equals: `10.0.10.11`
- SSL Router listening port: `443`
- Certificate file name: `gate-tunnel.p12`
- Certificate password: `Str0ngP@ssw0rd`

The `/etc/ipdiva/gateway-tunnel-master/gateway.xml` file would be configured as follows:

``` xml hl_lines="2 5 6 10"
<gateway>
    <server>10.0.10.11:443:ssl</server>
[…]
    <ssl>
        <cert>/etc/ipdiva/gateway-tunnel-master/ssl/gate-tunnel.p12</cert>
        <password>Str0ngP@ssw0rd</password>
[…]
    </ssl>
[…]
    <rpc-listen>127.0.0.1:9082</rpc-listen>
[…]
</gateway>
```

??? example "Complete file"
    ``` xml hl_lines="2 26 27 52"
    <gateway>
            <server>10.0.10.11:443:ssl</server>
            <pipe>
                    <ping-timeout>60000</ping-timeout>
                    <rout-max-lock>20000</rout-max-lock>
            </pipe>
            <timeout>
                    <reconnect>15000</reconnect>
            </timeout>
            <ticket><hmac></hmac></ticket>
            <proxy>
                    <type>no</type>
                    <address></address>
                    <login></login>
                    <password></password>
                    <domain></domain>
            </proxy>
            <periodic-licence-check>false</periodic-licence-check>
            <session>
               <sslconf name="default">
                  <ca-dir>/etc/ssl/certs</ca-dir>
                  <verify-cert>true</verify-cert>
               </sslconf>
            </session>
            <ssl>
                    <cert>/etc/ipdiva/gateway-tunnel-master/ssl/gate-tunnel.p12</cert>
                    <password>Str0ngP@ssw0rd</password>
                    <ca-dir>/etc/ipdiva/gateway-tunnel-master/ssl/ca</ca-dir>
                    <min-version>tls1.3</min-version>
                    <max-version></max-version>
                    <cipherlist>!ADH:!AECDH:!MD5:kEECDH+AES:kEDH+AES:AES256+RSA:3DES+RSA</cipherlist>
                    <cipherlist-tls1.3>TLS_CHACHA20_POLY1305_SHA256:TLS_AES_256_GCM_SHA384:TLS_AES_128_GCM_SHA256</cipherlist-tls1.3>
                    <verify-cert>true</verify-cert>
                    <verify-certhostnamematch>true</verify-certhostnamematch>
            </ssl>
            <webaccess>
                    <proxy></proxy>
                    <useragent>true</useragent>
                    <autoauth>true</autoauth>
                    <forceauth>false</forceauth>
                    <forcebasic>false</forcebasic>
                    <persistentbasicauth>true</persistentbasicauth>
                    <cache-date>Thu, 14 Dec 2006 09:28:00 GMT</cache-date>
                    <reverse-proxy>
                            <headers>
                                    <x-forwarded-for enabled='false'/>
                                    <x-forwarded-host enabled='false'/>
                            </headers>
                    </reverse-proxy>
                    <davenport compatibilityMode="false">127.0.0.1:8070</davenport>
            </webaccess>
            <rpc-listen>127.0.0.1:9082</rpc-listen>
            <network-id></network-id>
            <services>/etc/ipdiva/gateway-tunnel-master/services.xml</services>
            <compression>zlib</compression>
            <vlan>
                    <prefixe></prefixe>
            </vlan>

            <openvpn>
                    <ssl>
                            <cert>/usr/local/ipdiva/share/gw-controller-openvpnng/keys/allInOne.pem</cert>
                            <ca-file>/usr/local/ipdiva/share/gw-controller-openvpnng/keys/tmp-ca.crt</ca-file>
                            <version>tls1</version>
                    </ssl>
                    <client-ov>
                            <ip-type>V4</ip-type>
                            <dev-type>tun</dev-type>
                            <link-mtu>1507</link-mtu>
                            <tun-mtu>1500</tun-mtu>
                            <proto>TCPv4_CLIENT</proto>
                            <cipher>[null-cipher]</cipher>
                            <auth>[null-digest]</auth>
                            <keysize>0</keysize>
                            <key-method>2</key-method>
                            <tls-type>tls-client</tls-type>
                    </client-ov>
            </openvpn>
        <useoldprotocol>false</useoldprotocol>
        <rate>0</rate>
    </gateway>
    ```

Edit the file /etc/ipdiva/gateway-tunnel-slave/gateway.xml and complete it using the following information (several sections have been omitted and are indicated by […]):

 1
 2
 3
 4
 5
 6
 7
 8
 9
10
11
12
<gateway>
    <server>@SERVER@:@SERVERPORT@:ssl</server>
[…]
    <ssl>
        <cert>/etc/ipdiva/gateway-tunnel-slave/ssl/keyfile.pem</cert>
        <password>PASSWORD</password>
[…]
    </ssl>
[…]
    <rpc-listen>127.0.0.1:@RPC_PORT@</rpc-listen>
[…]
</gateway>

Replace the following elements:

  • @SERVER@: must be replaced with the address RIP_MED_SSL_SLAVE
  • @SERVERPORT@: must be replaced with the SSL router's listening port, normally set to 443
  • keyfile.pem: must be replaced with the name of the certificate file
  • PASSWORD: must be replaced with the certificate password
  • @RPC_PORT@: must be replaced with a port that is not currently in use on the machine; port 9083 can be used

??? example “Example” Taking into account the following information:

  1
  2
  3
  4
  5
  6
  7
  8
  9
 10
 11
 12
 13
 14
 15
 16
 17
 18
 19
 20
 21
 22
 23
 24
 25
 26
 27
 28
 29
 30
 31
 32
 33
 34
 35
 36
 37
 38
 39
 40
 41
 42
 43
 44
 45
 46
 47
 48
 49
 50
 51
 52
 53
 54
 55
 56
 57
 58
 59
 60
 61
 62
 63
 64
 65
 66
 67
 68
 69
 70
 71
 72
 73
 74
 75
 76
 77
 78
 79
 80
 81
 82
 83
 84
 85
 86
 87
 88
 89
 90
 91
 92
 93
 94
 95
 96
 97
 98
 99
100
101
102
103
104
105
106
- `RIP_MED_SSL_SLAVE` is equal to: `10.0.10.13`
- SSL Router listening port: `443`
- Certificate file name: `gate-tunnel.p12`
- Certificate password: `Str0ngP@ssw0rd`

The `/etc/ipdiva/gateway-tunnel-slave/gateway.xml` file would be configured as follows:

``` xml hl_lines="2 5 6 10"
<gateway>
    <server>10.0.10.13:443:ssl</server>
[…]
    <ssl>
        <cert>/etc/ipdiva/gateway-tunnel-slave/ssl/gate-tunnel.p12</cert>
        <password>Str0ngP@ssw0rd</password>
[…]
    </ssl>
[…]
    <rpc-listen>127.0.0.1:9083</rpc-listen>
[…]
</gateway>
```

??? example "Complete file"
    ``` xml hl_lines="2 26 27 52"
    <gateway>
            <server>10.0.10.13:443:ssl</server>
            <pipe>
                    <ping-timeout>60000</ping-timeout>
                    <rout-max-lock>20000</rout-max-lock>
            </pipe>
            <timeout>
                    <reconnect>15000</reconnect>
            </timeout>
            <ticket><hmac></hmac></ticket>
            <proxy>
                    <type>no</type>
                    <address></address>
                    <login></login>
                    <password></password>
                    <domain></domain>
            </proxy>
            <periodic-licence-check>false</periodic-licence-check>
            <session>
               <sslconf name="default">
                  <ca-dir>/etc/ssl/certs</ca-dir>
                  <verify-cert>true</verify-cert>
               </sslconf>
            </session>
            <ssl>
                    <cert>/etc/ipdiva/gateway-tunnel-slave/ssl/gate-tunnel.p12</cert>
                    <password>Str0ngP@ssw0rd</password>
                    <ca-dir>/etc/ipdiva/gateway-tunnel-slave/ssl/ca</ca-dir>
                    <min-version>tls1.3</min-version>
                    <max-version></max-version>
                    <cipherlist>!ADH:!AECDH:!MD5:kEECDH+AES:kEDH+AES:AES256+RSA:3DES+RSA</cipherlist>
                    <cipherlist-tls1.3>TLS_CHACHA20_POLY1305_SHA256:TLS_AES_256_GCM_SHA384:TLS_AES_128_GCM_SHA256</cipherlist-tls1.3>
                    <verify-cert>true</verify-cert>
                    <verify-certhostnamematch>true</verify-certhostnamematch>
            </ssl>
            <webaccess>
                    <proxy></proxy>
                    <useragent>true</useragent>
                    <autoauth>true</autoauth>
                    <forceauth>false</forceauth>
                    <forcebasic>false</forcebasic>
                    <persistentbasicauth>true</persistentbasicauth>
                    <cache-date>Thu, 14 Dec 2006 09:28:00 GMT</cache-date>
                    <reverse-proxy>
                            <headers>
                                    <x-forwarded-for enabled='false'/>
                                    <x-forwarded-host enabled='false'/>
                            </headers>
                    </reverse-proxy>
                    <davenport compatibilityMode="false">127.0.0.1:8070</davenport>
            </webaccess>
            <rpc-listen>127.0.0.1:9083</rpc-listen>
            <network-id></network-id>
            <services>/etc/ipdiva/gateway-tunnel-slave/services.xml</services>
            <compression>zlib</compression>
            <vlan>
                    <prefixe></prefixe>
            </vlan>

            <openvpn>
                    <ssl>
                            <cert>/usr/local/ipdiva/share/gw-controller-openvpnng/keys/allInOne.pem</cert>
                            <ca-file>/usr/local/ipdiva/share/gw-controller-openvpnng/keys/tmp-ca.crt</ca-file>
                            <version>tls1</version>
                    </ssl>
                    <client-ov>
                            <ip-type>V4</ip-type>
                            <dev-type>tun</dev-type>
                            <link-mtu>1507</link-mtu>
                            <tun-mtu>1500</tun-mtu>
                            <proto>TCPv4_CLIENT</proto>
                            <cipher>[null-cipher]</cipher>
                            <auth>[null-digest]</auth>
                            <keysize>0</keysize>
                            <key-method>2</key-method>
                            <tls-type>tls-client</tls-type>
                    </client-ov>
            </openvpn>
        <useoldprotocol>false</useoldprotocol>
        <rate>0</rate>
    </gateway>
    ```

Now that the instances are configured to connect to the Mediation Controllers, they still need to be configured to redirect the Mediation Controller connection to the database.
To do this, edit the /etc/ipdiva/gateway-tunnel-master/services.xml file and modify it as follows:

1
2
3
4
5
6
7
8
9
<services>
    <out>
        <service>
            <name>DB</name>
            <protocol>tcp</protocol>
            <connect>DB_SERVER:DB_PORT</connect>
        </service>
    </out>
</services>

Replace DB_SERVER with the DNS name or IP address used to connect to the database, and DB_PORT with the listening port of the database instance.
Replicate these settings for the instance connecting to the SLAVE Mediation Controller server by copying the file:

1
cp /etc/ipdiva/gateway-tunnel-master/services.xml /etc/ipdiva/gateway-tunnel-slave/

Finally, start the Edge Gateway instances so that they establish a connection to the Mediation Controllers:

1
2
/usr/local/ipdiva/gateway-tunnel-master/bin/start
/usr/local/ipdiva/gateway-tunnel-slave/bin/start
Configuring the Mediation Controllers tunnel

In order for the tunnel to be usable by the Mediation Controllers, you still need to declare their existence.
To do this, log in as root to the Mediation Controllers and edit the /etc/ipdiva/server/services.xml file to add the following section (several sections have been omitted and are marked with […]):

 1
 2
 3
 4
 5
 6
 7
 8
 9
10
11
12
13
14
<services>
[…]
    <in>
[…]
        <service>
            <name>DB</name>
            <gateway>GW1_NAME@ORGANIZATION_NAME</gateway>
            <gateway>GW2_NAME@ORGANIZATION_NAME</gateway>
            <protocol>tcp</protocol>
            <listen>127.0.0.1:1432</listen>
            <must-exist>true</must-exist>
        </service>
    </in>
</services>

Replace the following elements:

  • GW1_NAME by the name of the first Edge Gateway
  • GW2_NAME by the name of the second Edge Gateway
  • ORGANIZATION_NAME by the name of the cyberelements Gate organization that was created previously

??? example “Example” Taking into account the following information:

 1
 2
 3
 4
 5
 6
 7
 8
 9
10
11
12
13
14
15
16
17
18
19
20
21
22
23
24
25
26
27
28
29
30
31
32
33
34
35
36
37
38
39
40
41
42
43
44
45
46
47
48
49
50
51
52
53
54
55
56
57
58
59
60
61
62
- Name of Edge Gateway 1: `gate-tunnel-1`
- Name of Edge Gateway 2: `gate-tunnel-2`
- Name of the organization **cyber**elements Gate: `tunnel`

The `/etc/ipdiva/server/services.xml` file would be completed as follows:

``` xml hl_lines="5-12"
<services>
[…]
    <in>
[…]
        <service>
            <name>DB</name>
            <gateway>gate-tunnel-1@tunnel</gateway>
            <gateway>gate-tunnel-2@tunnel</gateway>
            <protocol>tcp</protocol>
            <listen>127.0.0.1:1432</listen>
            <must-exist>true</must-exist>
        </service>
    </in>
</services>
```

??? example "Complete file"
    ``` xml hl_lines="27-34"
    <services>
        <out>
            <service>
                <name>ntp</name>
                <protocol>udp</protocol>
                <connect>127.0.0.1:123</connect>
            </service>
            <service>
                <name>logging</name>
                <protocol>tcp</protocol>
                <connect>127.0.0.1:1514</connect>
            </service>
            <service>
                <name>clreanroom_acm</name>
                <protocol>tcp</protocol>
                <connect>127.0.0.1:8001</connect>
            </service>
        </out>
        <in>
            <service>
                <gateway>edge-gateway-1@my-organization-name</gateway>
                <protocol>tcp</protocol>
                <name>HTML5</name>
                <listen>127.0.0.1:1234</listen>
                <must-exist>true</must-exist>
            </service>
            <service>
                <name>DB</name>
                <gateway>gate-tunnel-1@tunnel</gateway>
                <gateway>gate-tunnel-2@tunnel</gateway>
                <protocol>tcp</protocol>
                <listen>127.0.0.1:1432</listen>
                <must-exist>true</must-exist>
            </service>
        </in>
    </services>
    ```

To apply the new configuration, restart the SSL Router with the following command:

1
/usr/local/ipdiva/server/bin/restart

Initializing the database

Attention!

You must create the default database before cyberelements Cleanroom initializes it (it is not created automatically).

To initialize the PostgreSQL system configuration database, you must first configure the connection settings on the Mediation Controllers.
To do this, edit the /etc/ipdiva/care/databasesettings.ini file on both servers and add the following entries:

2
3
4
5
6
7
8
9
[database]

ENGINE:django.db.backends.postgresql
NAME:default
USER:DB_USERNAME
PASSWORD:DB_PWD
HOST:DB_HOST
PORT:DB_PORT

Replace the following elements:

  • DB_USERNAME by the username used to connect to the database.
  • DB_PWD by the password of the user logging in.
  • DB_HOST by the IP address or DNS name used to connect to the database; if a connection via Edge Gateways is used, then you will need to enter 127.0.0.1.
  • DB_PORT by the port used to connect to the database instance; if a connection via Edge Gateways is used, then you will need to enter 1432.

The database initialization can be launched with the following commands, to be executed only on a Mediation Controller:

1
2
cd /var/lib/ipdiva/care/
python3 manage.py migrate

After that, all that remains is to restart the apache2 service on both Mediation Controllers to apply the initialization of the system database:

1
systemctl restart apache2

Configuring an NTP time server

It is recommended to set up a time server to keep the system clock up to date. The necessary steps are described on the NTP configuration page.

Initial configurations of cyberelements Cleanroom

Authorization of access to web interfaces with the virtual IP

By default, it is not allowed to connect to the product's cyberelements Cleanroom web interfaces with the virtual IP VIP_MED_WEB.
To add the authorization, run as root the following commands on the Mediation Controllers:

1
2
sed -i '2s/$/, IP/' /etc/ipdiva/care/djangosettings.ini
systemctl restart apache2

Replace IP with the IP address corresponding to VIP_MED_WEB.

Initial configurations

At this stage, the Mediation Controllers servers are installed, but several actions still need to be performed:

  • Change the default passwords


    Change the default passwords for the system consoles.

    Change

  • Install certificates and licenses


    The Mediation Controller requires various certificates and a license to be operational.
    Only the certificate for the cyberelements Cleanroom client needs to be re-declared on both Mediations Controllers (use the RIP RIP_MED_WEB_MASTER and RIP_MED_WEB_SLAVE).

    Install certificates and license

  • Configure the web certificate


    Configure the web certificate used to connect to web interfaces

    Configure

  • Declare a DNS name


    Add a DNS name authorized to connect to web interfaces.

    Add