View and process a workflow task
This feature allows the connected user to view and process workflow tasks that are awaiting their attention. This is because some tasks configured in workflows require validation or manual intervention.
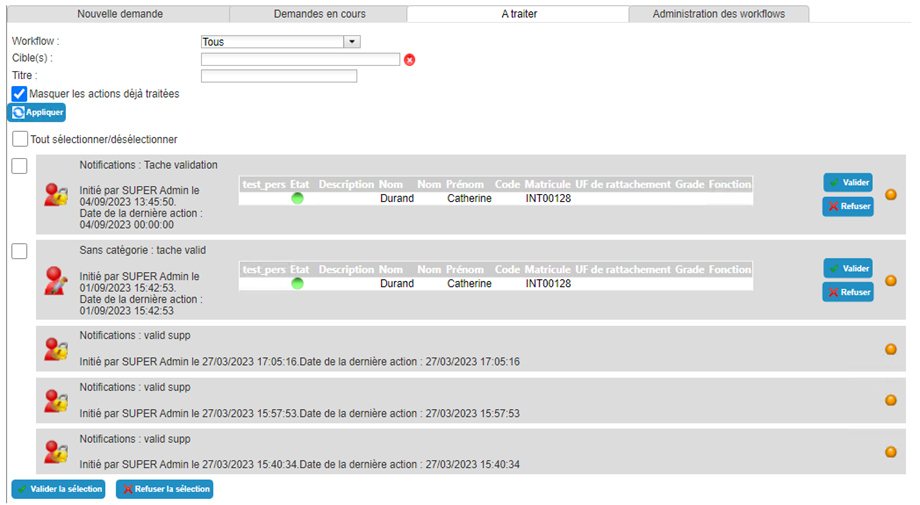
To access the workflow task processing page, go to the “Workflows” menu and select the “To be processed” tab.
The different types of tasks are:
- Generic
- Approval of person creation or deletion
- Approval of authorization request
- Approval of person modification
- Approval of resource request
- Assigning a resource to a person
It is possible to perform bulk approvals or rejections. To do so, select all the workflows for which you want to process the task. The “Select/Deselect all” checkbox allows you to select or deselect all the workflows displayed in the tab.
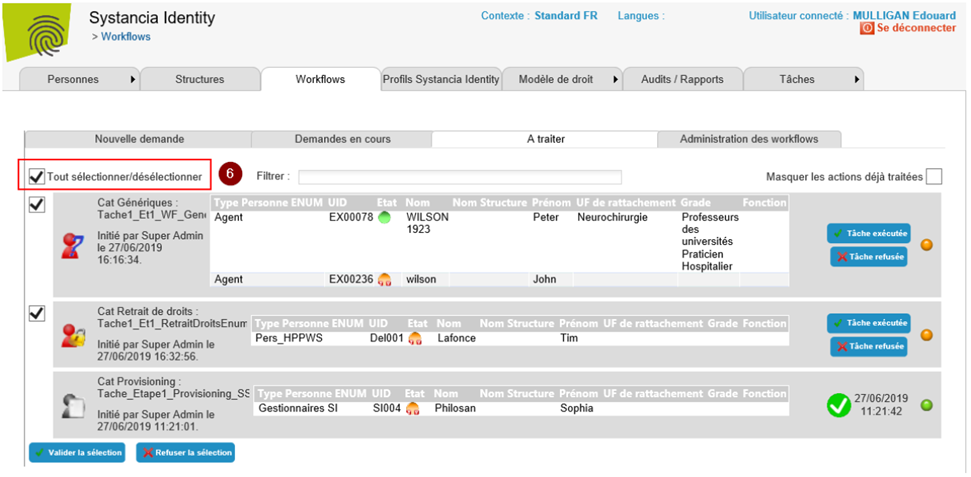
Click on the “Approve selection” button to complete the tasks of the selected workflows with the status “Success”.
Click on the “Reject selection” button to complete the tasks of the selected workflows with the status “Failure”.
Process a generic task
A generic task allows you to perform a task that can be approved or rejected. The task is open-ended and is usually described in free text in the “Request description” attribute.
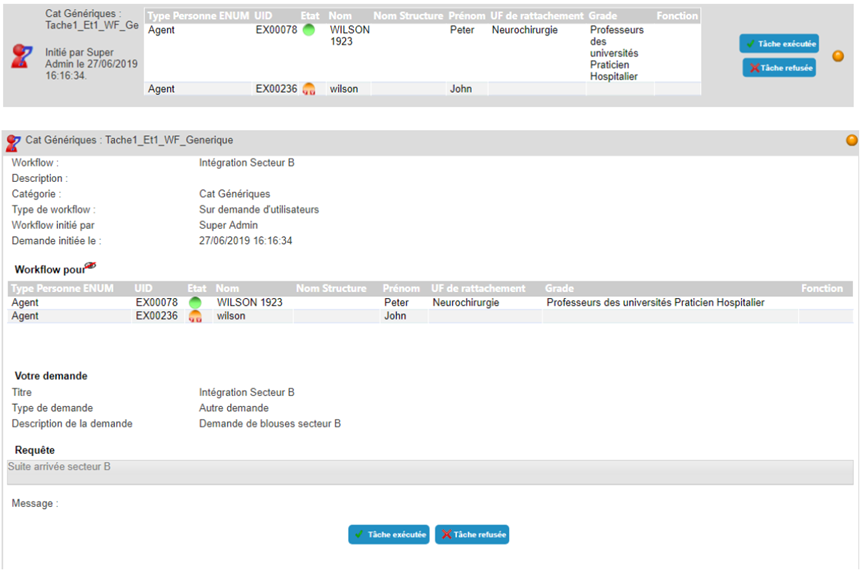
The “task completed” and “task rejected” buttons are available to process the task.
Click on the “Task completed” button to complete the task with the status “Success".
Click on the “Task rejected” button to complete the task with the status “Failure".
The progress of the workflow can be viewed by clicking on the colored ball.
Processing a task to approve the creation or deletion of a person
A task to approve the creation or deletion of a person allows you to insert an approval step into the Identity repository update process.
To view the details of the validation task, click on the workflow banner.
Approval tasks for the creation or deletion of persons relate to one person. The target person is located in the table under the heading “Workflow for".
You can add a comment before processing the task. This comment will be included in the workflow history. Each person involved in the workflow will be able to view the comments entered by either the requester or previous participants. Click on the “Save” button to save the comment.
Note: the changes described above are only possible if the workflow configuration allows it. Contact the administrator for more details if necessary.
The “Approve” and “Reject” buttons are available to process the task.
Click on the “Approve” button to complete the task with the status “Success”.
Click on the “Reject” button to complete the task with the status “Failure”.
The progress of the workflow can be viewed by clicking on the colored ball.
Processing a validation task for an authorization request
A validation task allows you to submit a request to one or more persons before performing an action.
To view the details of the validation task, click on the workflow banner.
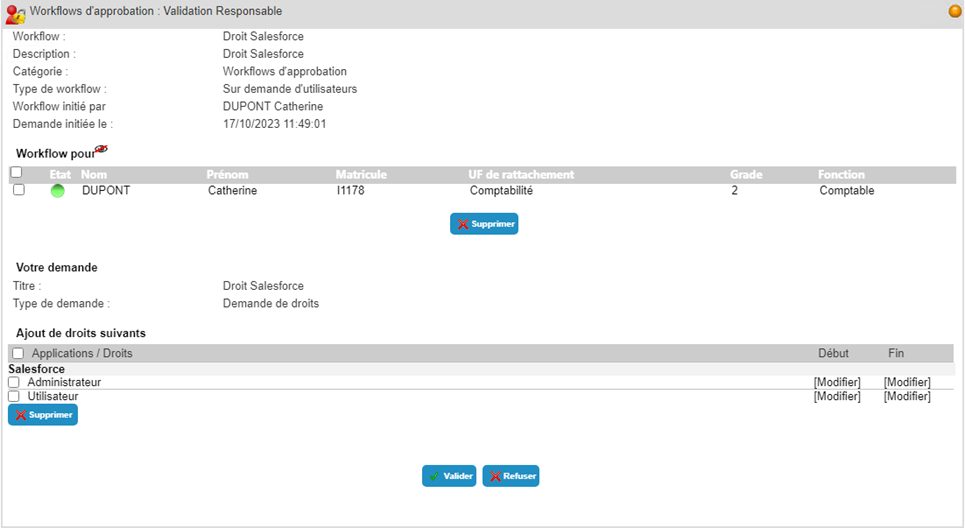
Validation tasks for authorization requests involve at least one person. These persons are listed in the table under the heading “Workflow for”.
It is possible to remove one or more persons from the target. To do this, select the persons to be removed and then click on the “Remove” button located below the person table.
The requested authorizations are located in the second table under the heading “Add the following rights”. Each authorization request applies to all targets in the workflow.
It is possible to remove one or more requested authorizations. To do this, select the authorizations to be deleted and then click on the “Delete” button located below the table.
It is possible to modify the dates of application of the authorization by modifying either the start date, the end date, or both. Each modification will be applied to all targets in the workflow.
You can add a comment before processing the task. This comment will be included in the workflow history. Each person involved in the workflow will be able to view the comments entered by either the requester or previous participants. Click on the “Save” button to save the comment.
Note: the changes described above are only possible if the workflow configuration allows it. Contact the administrator for more details if necessary.
The “Approve” and “Reject” buttons are available to process the task.
Click on the “Approve” button to complete the task with the status “Success”.
Click on the “Reject” button to complete the task with the status “Failure”.
If the workflow configuration allows a task to be replayed, in the event of a change in the application dates of authorizations, a “Replay” button is also available. You can click this button to restart the workflow and go through all the validation steps again. This option is useful in the event of multiple validation steps.
The progress of the workflow can be viewed by clicking on the colored ball.
Processing a validation task for a person change request
A validation task allows you to submit a request to one or more people before performing an action.
To view the details of the validation task, click on the workflow banner.
Validation tasks for requests to modify person attributes involve at least one person. These persons are listed in the table under the heading “Workflow for”.
It is possible to remove one or more persons from the target. To do this, select the persons to be removed and then click on the “Remove” button located below the person table.
The requested attribute changes are located in the request form under the heading “Information to be updated”. Each request to change attribute values applies to all targets in the workflow.
You can add a comment before processing the task. This comment will be included in the workflow history. Each person involved in the workflow will be able to view the comments entered by either the requester or previous participants. Click on the “Save” button to save the comment.
Note: the changes described above are only possible if the workflow configuration allows it. Contact the administrator for more details if necessary.
The “Approve” and “Reject” buttons are available to process the task.
Click on the “Approve” button to complete the task with the status “Success”.
Click on the “Reject” button to complete the task with the status “Failure”.
The progress of the workflow can be viewed by clicking on the colored ball.
Processing a resource request validation task
A validation task allows you to submit a request to one or more people before performing an action.
To view the details of the validation task, click on the workflow banner.
Validation tasks for resource requests involve assigning one or more resource types to one or more individuals. The individuals targeted by the request are listed in the table under the heading “Workflow for”.
It is possible to remove one or more persons from the target. To do this, select the persons to be removed and then click on the “Remove” button located below the person table.
The types of resources requested are listed in the request form under “Add resource types”.
You can add a comment before processing the task. This comment will be included in the workflow history. Each person involved in the workflow will be able to view the comments entered by either the requester or previous participants. Click on the “Save” button to save the comment.
Note: Comments can only be added if the workflow configuration allows it. Contact the administrator for more details if necessary.
The “Approve” and “Reject” buttons are available to process the task.
Click on the “Approve” button to complete the task with the status “Success”.
Click on the “Reject” button to complete the task with the status “Failure”.
The progress of the workflow can be viewed by clicking on the colored ball.
Processing a resource assignment task
A resource assignment task allows you to create one or more associations between a person and a resource.
To view the details of the resource assignment task, click on the workflow banner.
The resource assignment task form is divided into three parts:
- The first part of the form contains a drop-down list for selecting the type of resources to be processed
- The second part of the form contains a table with the people targeted by the request
- The third part of the form contains a table of available resources whose type is the one selected in the first part
You can create a new resource by clicking on the “Create a resource” button. After clicking on the button, fill in the creation form and confirm. The resource created will be added to the table of available resources.
To link a resource to a person, you must:
- Select the type of resource
- Select the desired person by clicking on the “
 ” icon located to the left of the line in the table of target persons.
 - Select the desired resource by clicking on the “” icon located to the left of the line in the table of the list of available resources.
- Click on the “Associate” button to link the selected person and resource.
This operation must be performed as many times as there are person/resource pairs in the task.
It is possible to unlink a resource from a person by clicking on the “ ” icon.
You can add a comment before processing the task. This comment will be included in the workflow history. Each person involved in the workflow will be able to view the comments entered by either the requester or previous participants. Click on the “Save” button to save the comment.
Note: Comments can only be added if the workflow configuration allows it. Contact the administrator for more details if necessary.
The “task completed” and “task rejected” buttons are available to process the task.
Click on the “Task completed” button to complete the task with the status “Success".
Click on the “Task rejected” button to complete the task with the status “Failure".
The progress of the workflow can be viewed by clicking on the colored ball.
Processing a manual provisioning or deprovisioning task
A manual provisioning or deprovisioning task allows you to specify to the task recipient that they must assign or remove an authorization to a person in a target repository.
To view the details of the manual provisioning or deprovisioning task, click on the workflow banner.
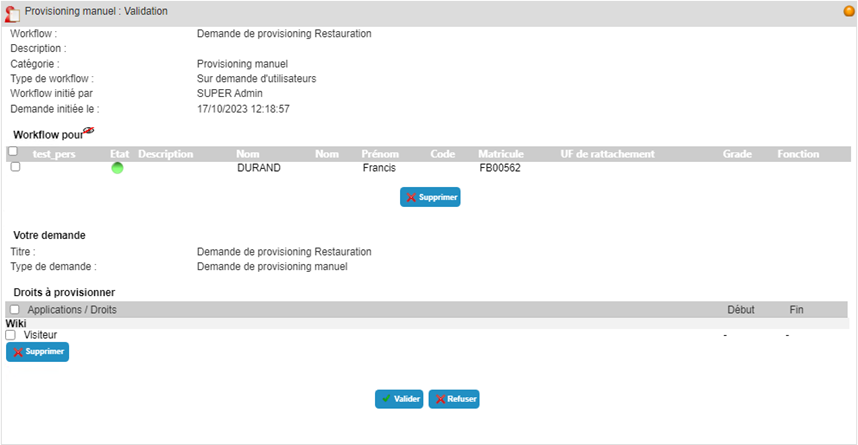
The manual provisioning/deprovisioning task form contains a table that lists the target persons and the authorizations concerned.
You can add a comment before processing the task. This comment will be included in the workflow history. Each person involved in the workflow will be able to view the comments entered by either the requester or previous participants. Click on the “Save” button to save the comment.
Note: Comments can only be added if the workflow configuration allows it. Contact the administrator for more details if necessary.
The “task completed” and “task rejected” buttons are available to process the task.
Click on the “Task completed” button to complete the task with the status “Success".
Click on the “Task rejected” button to complete the task with the status “Failure".
The progress of the workflow can be viewed by clicking on the colored ball.
Transfer a task
If the workflow configuration allows it, it is possible to transfer a task to a third party.
To view the details of the resource assignment task, click on the workflow banner.
To transfer a task, select the task to view its details. In the “Transfer action to:” field, select the desired person from the search form, then click on the “Transfer” button.
Once the task has been transferred, it is removed from the list of tasks to be processed.