Management of attribute categories
An attribute category allows you to group several attributes under the same label. A category is not linked to a specific object type and can be used in the four existing object types: identity, structure, allocation, and account.
Create/modify/delete an attribute category
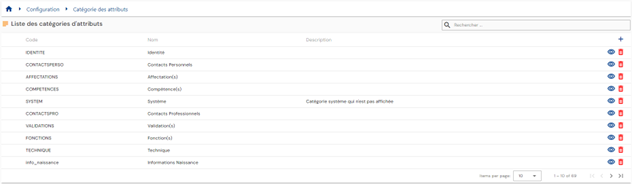
To access attribute category management, go to the “Configuration \ Attribute Categories” menu.
You will see a list of existing attribute categories.
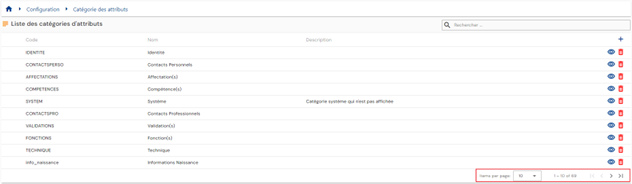
Pagination is set up to display only 10 attribute categories by default, but it is possible to change the number of items displayed.
A search field is available at the top right of the table. The search covers the codes, names, and descriptions of attribute categories, i.e., the fields displayed in the table.

To create a new attribute category, click on the “ ” button.

Enter the general parameters for an attribute category:
- Icon: image that can be chosen from a list. Will be included in the person files. Optional.
- Color code: distinctive color to define the attribute category. Will be included in the person files. Optional.
- Code: attribute category code. Must be unique, without spaces or special characters. Mandatory.
- Name: name of the attribute category. Label that will be displayed in the various forms of the application. Mandatory.
- Description: field that allows you to enter a description of the attribute category. Optional.

To view or modify an attribute category, click on the “ ” icon located on the right in the matching table row.

You can switch to edit mode directly from the attribute category display page.

Actions on buttons in edit or create mode:
- Cancel: cancels the current entry and returns to the attribute list page.
- Save: Validates the form and switches the page to view mode.
- Save and quit: Validate the form and return to the attribute list page.
To delete an attribute category, click on the “ ” icon located to the right in the matching table row.

A confirmation message will appear before the attribute is deleted.
Warning: it is not possible to delete an attribute category as long as it is linked to objects.
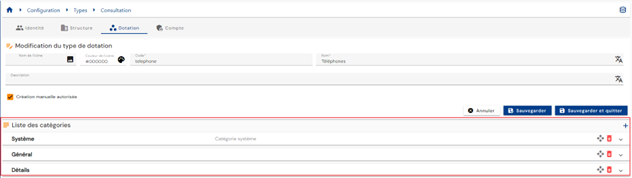
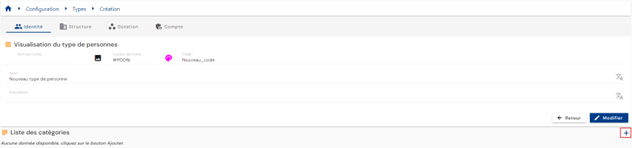
Manage categories and attributes on object types
For each object type (identity, endowment, structure, or account), it is possible, and even necessary, to add categories and attributes to customize the various forms.
Categories and attributes must exist before they can be added to an object type.
Attributes are configured with a default category, but it is possible to change the category of an attribute for each object type.
To add, modify, or delete a category and/or attribute, open an object type in view mode.
To add one or more categories to an object type, click on the “” icon.
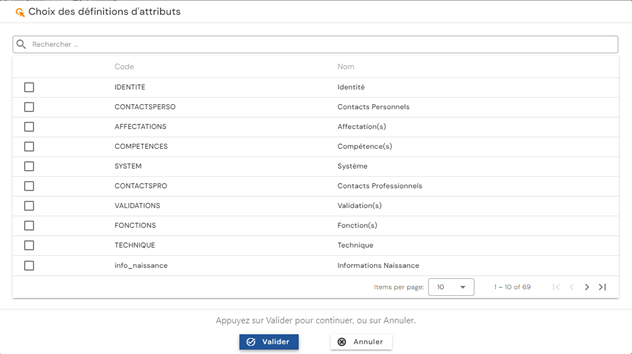
Previously created attributes whose default category is part of the list of selected categories are automatically added to the object type. You can add, modify, or delete attributes individually in each category.
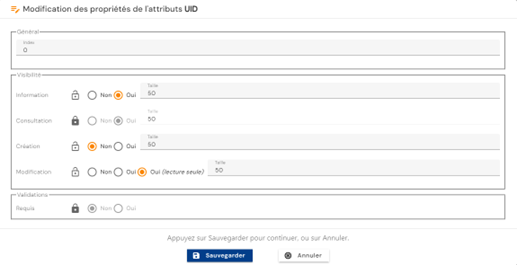
It is also possible to modify default configurations on the attributes of an object type:
-
Display index: display index in the category
-
Visibility
- The display modes for the attribute in forms are:
- Information: If yes, display the attribute in the person record insert (top right).
- Consultation: If yes, display the attribute in the form in view mode.
- Creation: If yes, display the attribute in the form in creation mode.
- Modification: If yes, allow the attribute to be modified in the form in modification mode. If yes (read-only), display the attribute but do not allow it to be modified.
- For each display mode, it is possible to specify the percentage of the line to be attributed for display. Examples:
- 100: the attribute will be displayed on the entire line.
- 50: allows 2 attributes to be displayed on one line.
The visibility mode and default display index are defined and represented by a closed padlock (
 ). It is possible to specify that you want to apply a different configuration. In this case, you must click on the padlock to unlock it (
 ) and then apply the change. Clicking on an unlocked padlock returns you to the default display mode.
 - The display modes for the attribute in forms are:
-
Validations
- Indicates whether the attribute is mandatory when entering creation and modification forms
It is possible to move an attribute from one category to another. To do this, you must delete the attribute from the initial category and add it to the desired category (the operation can be done in reverse, adding it to the new category and then deleting it from the old category).
Note: For identity and allocation types, system attributes, which are mandatory, are automatically created in the solution with the default category “System”. This category is automatically added when these object types are created. These attributes can be changed to a different category or hidden, but they cannot be completely deleted. To change the category of a mandatory attribute, you must add the attribute to the desired category before you can delete it from its default category.
The mandatory attributes for identity types are as follows:
- Name
- First name
- Display name
- Uid
- External identifier
- Status
- Person type
- Active person
The required attributes for allocation types are as follows:
- Resource type
- Name
- Code
- Description
To delete a category, click on the “” button for the desired category.
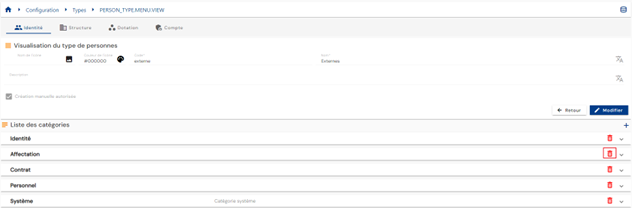
A confirmation message will appear before the category is deleted.
Warning: it is not possible to delete a category if any identities have attribute values that are present in the category to be deleted.
To change the display order of categories, switch the object type to edit mode, then click on the “ ” button to the right of the desired category and move it to the desired location.