Management of repositories
A repository is defined as a centralized source or data location that stores and manages account information for users, groups, and resources within a system or organization.
In Systancia Identity, a repository can have several applications in which accounts, roles, and permissions are distributed.
Create/modify/delete a repository
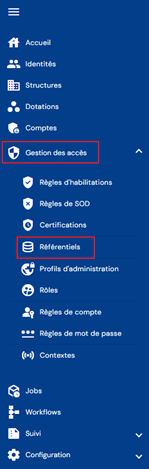
To access repository management, go to the “Access Management/Repositories” menu.
You will be taken directly to the list of existing repositories, preloaded in a table with no filters applied.
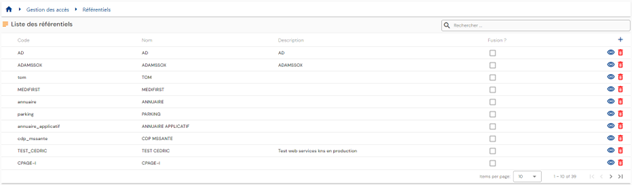
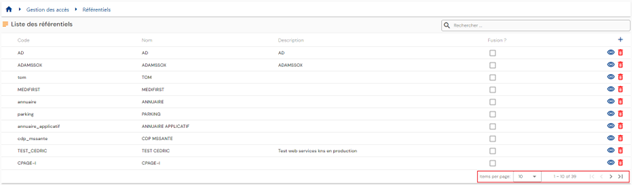
Pagination is set up to display only 10 repositories.
A search field is available at the top right of the table. The search covers the “code” and “name” attributes of the repositories.
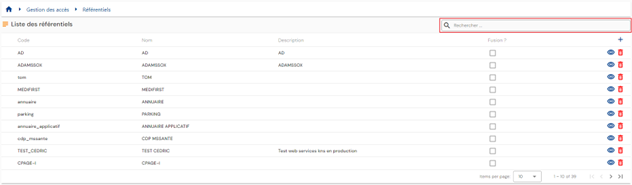
To create a new repository, click on the “ ” button.

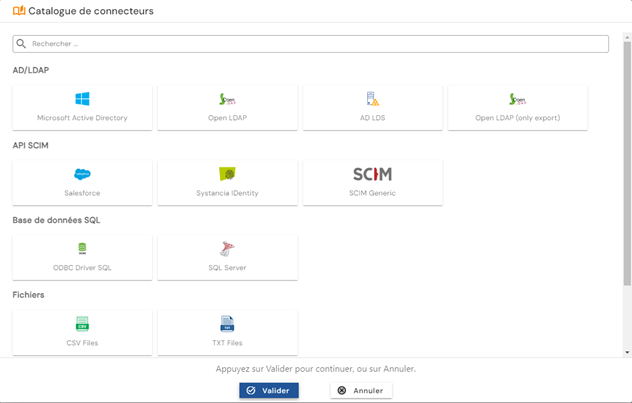
Choose the type of application from the connector catalog.
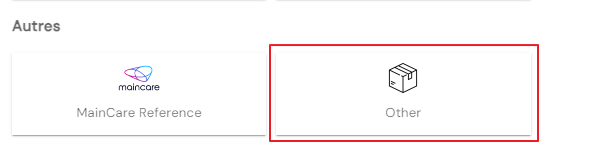
If the repository is not linked to an automatic connector, select the “Other” option in the Other category.
First, enter the general parameters of a repository:
- Code: code of the repository. Must be unique, without spaces or special characters. Mandatory.
- Name: name of the repository. Label that will be displayed in the various forms of the application. Mandatory.
- Description: field for entering a description of the repository. Optional.
- Default role: select the role that will be used by workflows if authorization requests are made on the repository. Optional.
- Export type: allows you to determine the export type that will be used in the provisioning connector. This information is used to determine which type of attribute will be used for dynamic authorizations.
If Account+Access is selected, dynamic authorizations will be linked to account attributes; if user+Access is selected, dynamic authorizations will be linked to person attributes. This information is mandatory in the case of automatic provisioning; the default value is Account+Access.

Click on the “SIP Configuration” button to configure an automatic connector. The button is not accessible if the repository selection is “Other”.
Validate the creation form to configure the applications and permissions, account types, and repository roles.
Actions on buttons in creation mode:
- Cancel: cancels the current entry and returns to the repository list page.
- Save: validates the form and switches the page to view mode.
- Save and quit: validates the form and returns to the repository list page.
To view and edit a repository, click on the “ ” icon located to the right of the corresponding table row:

You can switch to edit mode directly from the repository view page.

In edit mode, all fields can be modified.
Actions on buttons in edit mode:
- Cancel: cancels the current entry and switches the page to view mode.
- Save: validates the form and switches the page to view mode.
- Save and quit: validates the form and returns to the login policy list page.
To delete a repository, click on the icon “ ” located to the right of the corresponding table row:

A confirmation message will appear before the repository is deleted.
Warning: it is not possible to delete a repository as long as linked objects exist.
Configuring an automatic connector (via SIP)
Configuring an automatic connector involves defining the connection parameters between Systancia Identity and a third-party application. Connection modes can be:
- Directory (AD, LDAP, OpenLDAP, ADLDS, etc.)
- Flat file (csv, xml)
- DB
- API (SCIM)
For each repository, it is possible to configure an automatic connector in order to perform provisioning sequences (upstream or downstream). Note that as of version 7.0, for the Identity repository, there is no longer any need to configure an ODBC link. Communication between Systancia Identity Provisioning and Systancia Identity is automatic and transparent.
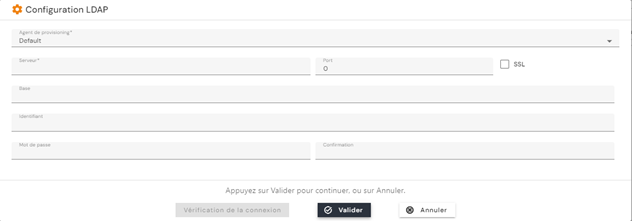
Access to the configuration of an automatic connector is available on the repository page opened in view mode. Click on the “SIP Configuration” button.

For each connector configuration, regardless of the connection mode, you must specify the provisioning agent. The provisioning agent is entered by default when there is only one.
Note: in version 7.0, only one provisioning agent can be configured. This is created by default, whether upgrading or installing for the first time.
Otherwise, the configuration forms vary depending on the connection mode to be configured.
Directory-type connection, old connector
For a directory-type connection, old connector, allowing export and import (LDAP, AD, OpenLDAP, etc.), the following information must be entered:
- Server: address of the server on which the directory is located
- Port: connection port
- SSL: check if SSL connection is to be enabled
- Base: Root of the tree from which data will be extracted or written. e.g.: “DC=Domain,DC=local”
- Username: login account
- Password: login account password
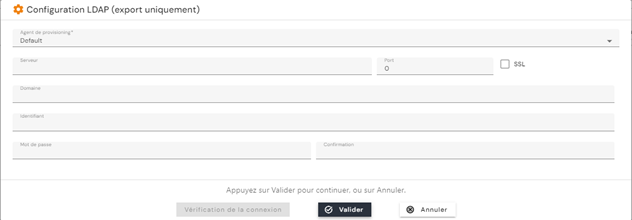
Directory-type connection, new connector
For a Directory-type connection, new connector, allowing only export (LDAP, AD, OpenLDAP, etc.), you must enter the following information:
- Server: address of the server on which the directory is located
- Port: connection port
- SSL: check if SSL connection is to be enabled
- Domain: Root of the tree from which data will be extracted or written. e.g.: “Domain.local”
- Username: login account
- Password: login account password
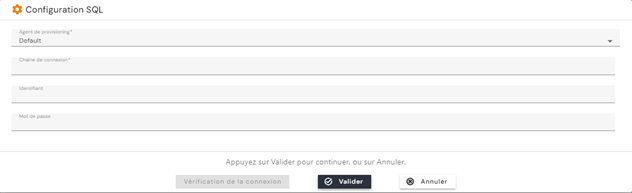
DB-type connection
For a database connection (SQL Server, Oracle, PostgreSQL, etc.), you must enter the following information:
- Pre-created connection string (ODBC link, etc.)
- Username: login account
- Password: login account password
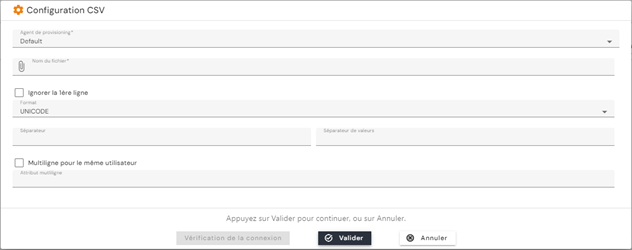
Flat file connection (CSV, TXT, etc.)
- File name: full path to the file.
- Skip the first line: check this box if the file contains a header.
- Format: ASCII or Unicode
- Separator: character representing the column separator
- Value separator: character representing the value separator in the case of a multi-valued attribute
- Multi-line for the same user: Name of the attribute whose value is unique (e.g., employee number, login, etc.) and which serves as a pivot attribute for managing multi-valued values.
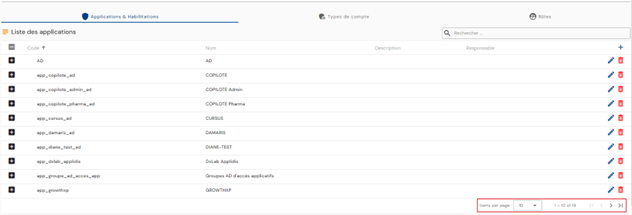
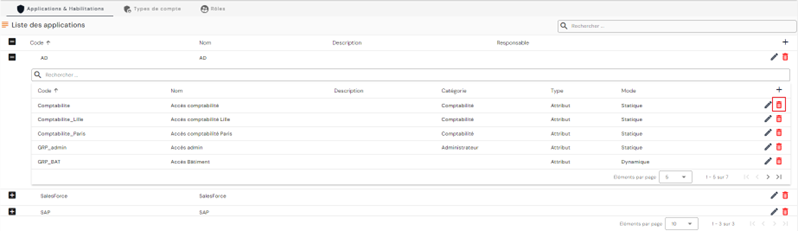
Create/modify/delete applications and authorizations
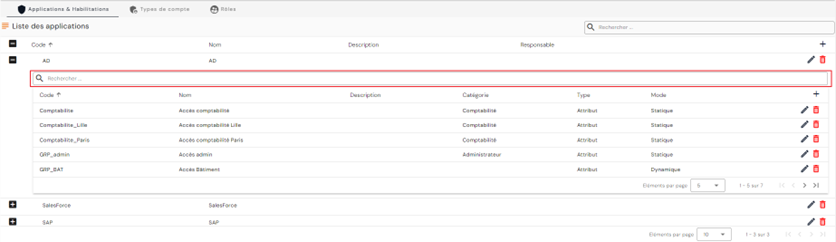
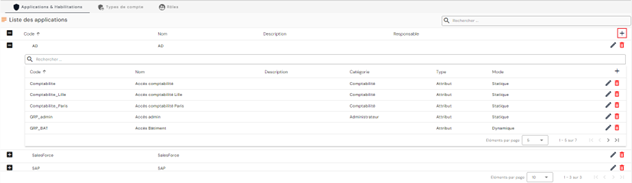
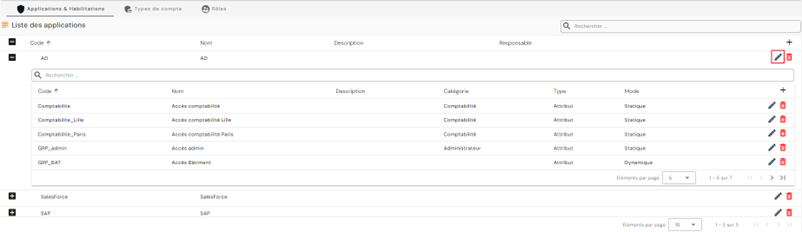
To access the management of applications and authorizations for a repository you must navigate to the repository page in view mode, then open the “Applications and Authorizations” tab.
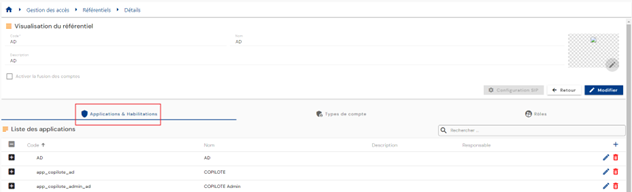
The list of existing applications is preloaded without any filters applied, but in accordance with the permissions associated with the profile of the person connected.
The list of authorizations associated with an application is displayed in a table embedded in the application.
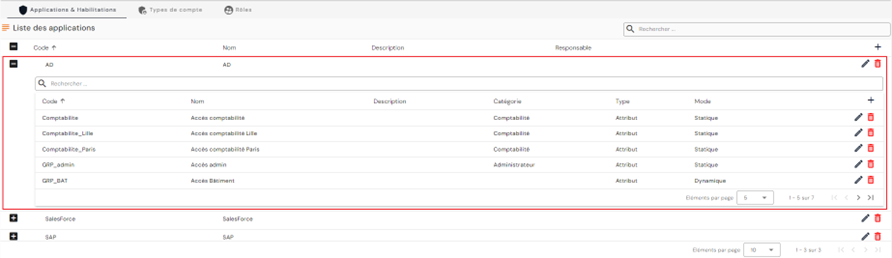
Pagination is implemented to display only 10 applications.
In the embedded table of authorizations, pagination is set up to display only 5 authorizations.
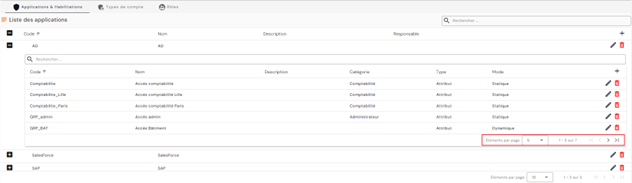
A search field is available at the top right of the application table. The search covers the code and name of the applications.
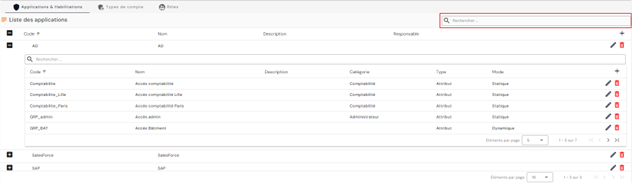
Similarly, in the embedded table of authorizations, a search field is available at the top of the table. The search covers the “Category,” “Code,” and “Name” attributes of authorizations.
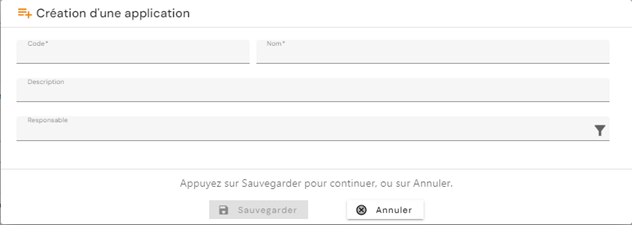
To create a new application, click on the “” button at the top right of the applications table.
Enter the parameters for an application:
- Code: application code. Must be unique, without spaces or special characters. Mandatory.
- Name: name of the application. Label that will be displayed in the various forms of the application. Mandatory.
- Description: field for entering a description of the application. Optional.
- Responsible: select one or more persons from the list of identities. Optional.
To create a new authorization, open the embedded table for the application to which you want to attach the authorization and click on the “” button located at the top right of the authorization table.
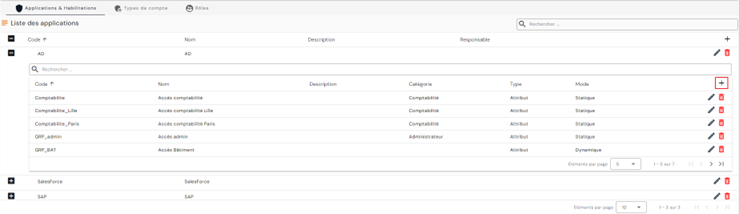
Enter the parameters for an authorization:
- Code: authorization code. Must be unique, without spaces or special characters. Mandatory.
- Name: name of the authorization. Label that will be displayed in the various forms of the application. Mandatory.
- Description: field for entering a description of the application. Optional.
- Category: select a category from the list or create a new category. To create a new category, click on the “” button to the right of the drop-down list. Optional.
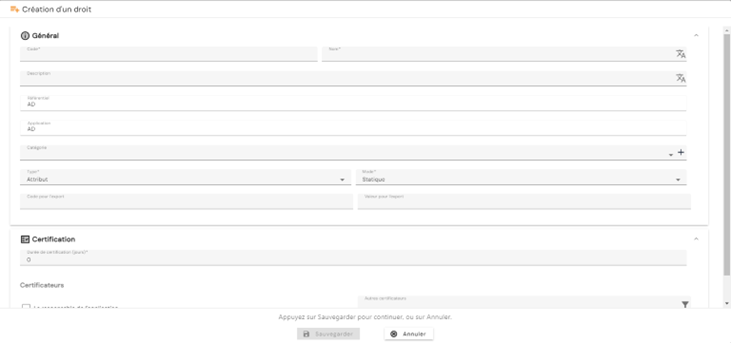
- Type:
- Group. Option available to manage backward compatibility in case of version upgrades. This option is deprecated as of 7.0.
- Attribute
- Mode:
- Static: Value of the right to be defined
- Dynamic: Value from an attribute
- Export code: attribute name that will be exported in the “USER+ACCESS” and “ACCOUNT+ACCESS” exports
- Export value:
- Either a free field if Mode = static
- Or a field for selecting an attribute if Mode = dynamic. The attribute must be an account attribute if the connector is created with an “ACCOUNT + ACCESS” export type, or an identity attribute if the connector is created with a “USER + ACCESS” export type
Note: the “USER + ACCESS” export is retained in version 7.0 to manage backward compatibility in the event of a version upgrade. It is deprecated as of version 7.0.

To modify an application, click on the “ ” icon located to the right in the corresponding table row.
All fields can be modified.
To modify an authorization, open the embedded table of the application in which you want to modify an authorization and click on the icon “” located on the right in the corresponding table row.
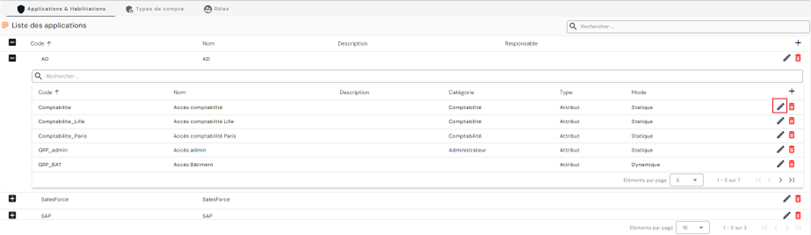
All fields can be modified.
Actions on buttons in creation and modification mode (applications and authorizations):
- Cancel: cancels the current entry and returns to the repository page.
- Save: Validate the form and return to the repository page
To delete an application, click on the icon “” located to the right of the corresponding row in the table.
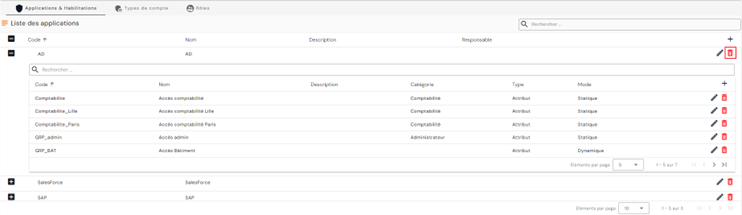
A confirmation message will appear before the application is deleted.
Warning: it is not possible to delete an application as long as related objects exist.
To delete an authorization, open the embedded table of the application in which you want to delete an authorization and click on the “” button located to the right in the corresponding table row.
A confirmation message will appear before the authorization is deleted.
Warning: it is not possible to delete an authorization as long as related objects exist.
Role management
Starting with version 7.0, roles are added to rights template management. Roles, which can be related to job profiles, allow you to predefine a set of permissions but also to multiply accounts for a single identity if necessary. For example, a person who has an administrator and standard user role can be assigned two accounts to use the one required for the operations they need to perform.
Create/modify/delete a role (business profile)
To access role management, go to the “Access Management/Roles” menu.

You will be taken directly to the list of existing roles, preloaded in a table with no filters applied but respecting the permissions linked to the profile of the person connected.

Pagination is set up to display only 10 roles.

A search field is available at the top right of the table. The search focuses on the “code” and “name” attributes of roles.

To create a new role, click on the “” button.

Enter the general parameters for a role:
- Code: role code. Must be unique, without spaces or special characters. Mandatory.
- Name: name of the role. Label that will be displayed in the various forms of the application. Mandatory.
- Description: field for entering a description of the role. Optional.

Validate the creation form to add links to repositories and default authorizations.
To view and edit a role, click on the “” icon located to the right of the corresponding table row.

It is possible to switch to edit mode directly from the role view page.
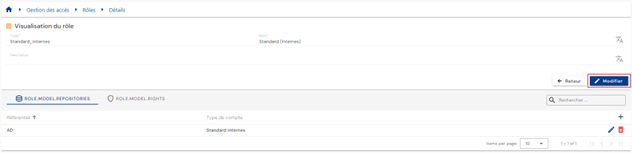
In edit mode, all fields can be modified.
Actions on buttons in edit or create mode:
- Cancel: cancels the current entry and switches the page to view mode
- Save: Validate the form and switch the page to view mode
- Save and quit: Validate the form and return to the role list page
To delete a job, click on the icon “” located to the right of the corresponding table row.

A confirmation message will appear before the role is deleted.
Warning: it is not possible to delete a role as long as related objects exist.
- You can manage links to repositories from this configuration page.
- You can manage default authorizations for a role from this configuration page.
Manage links between a repository and a role
Creating a link between a role and a repository allows you to generate an account when an identity has a role and meets the conditions for obtaining an account (identity status, whether or not the identity has rights, etc.).
A link between a repository and a role can be created in two different ways:
- Either on the configuration page for a role
- Or on the configuration page for a repository
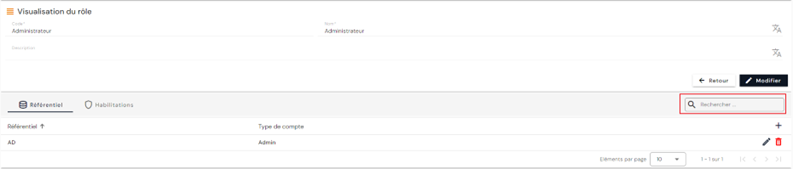
To add a link to a repository from the configuration page for a role, open the desired role in view mode and open the “Repository” tab. The list of repositories associated with the role is preloaded without any filters applied, but respecting the permissions linked to the profile of the person connected.
Pagination is implemented to display only 10 existing linked repositories.
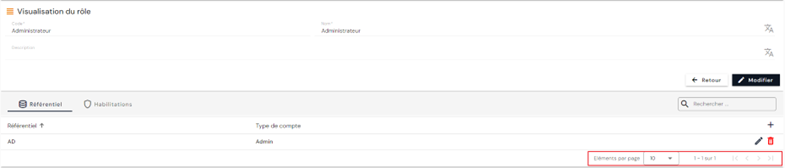
A search field is available at the top right of the linked repositories table. The search is based on the names of the repositories.
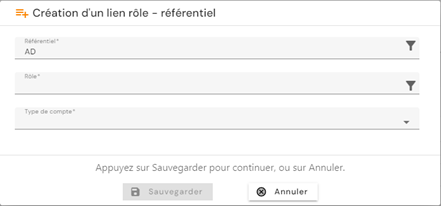
To create a new link to a repository, click on the “” button at the top right of the table.
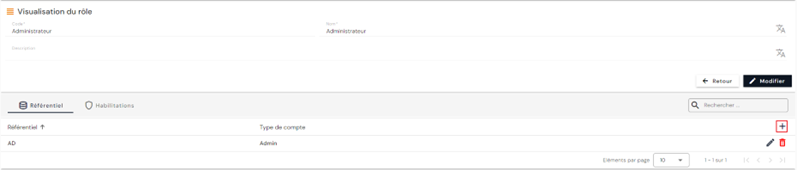
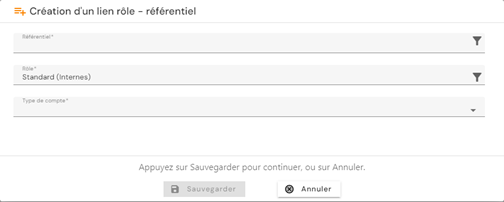
Choose a repository from the list, then select the type of account to use. Save to register the link.
Repeat this process for each link you want to create.
To modify a repository linked to the role, click on the “” icon located on the right in the corresponding table row.
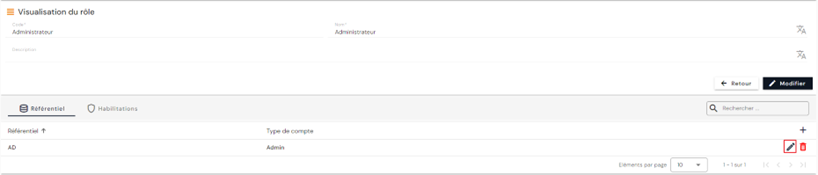
The account type can be modified.
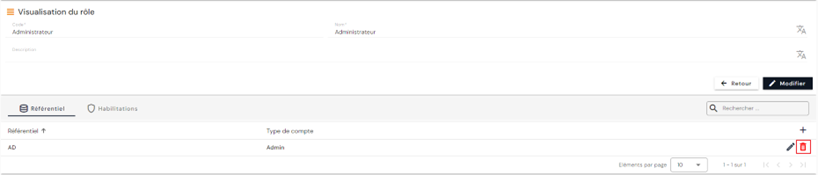
To delete a repository linked to a role, click on the icon “” located on the right in the corresponding table row.
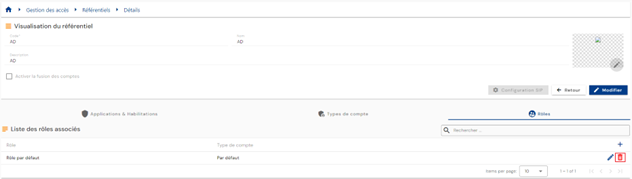
To add a link to a repository from the repository configuration page, open the desired repository in view mode, then open the “Roles” tab. The list of associated roles is preloaded without any filters applied, but respecting the permissions linked to the profile of the person connected.
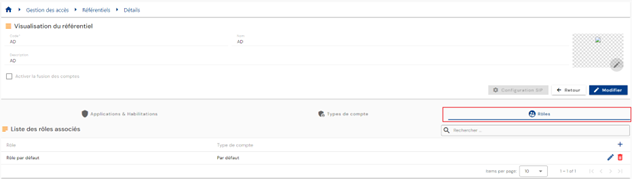
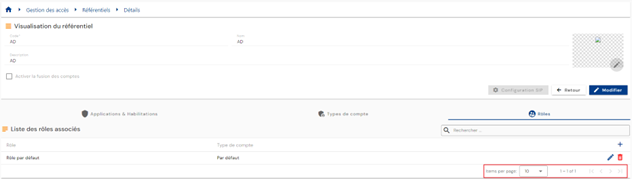
Pagination is implemented to display only 10 existing role/repository links.
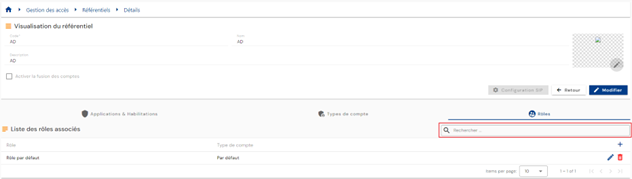
A search field is available at the top right of the role/repository links table. The search is based on the names of the roles.
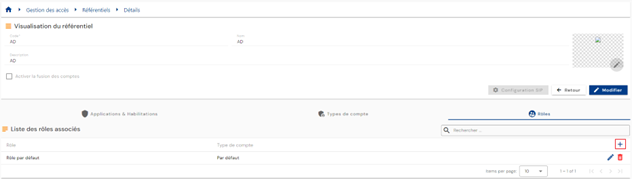
To create a new role/repository link, click on the “” button at the top right of the table.
Choose a role from the list, then select the type of account to use. Save to register the link.
To modify a role-repository association, click on the “” icon located on the right in the corresponding table row.

The account type can be modified.
Actions on the buttons in create and edit mode:
- Cancel: cancels the current entry and returns to the repository page.
- Save: Validate the form and return to the repository page
To delete a role-repository association, click on the icon “” located to the right of the corresponding table row.
A confirmation message will appear before the role-repository association is deleted.
Warning: it is not possible to delete a role-repository association as long as linked objects exist.
Management of default authorizations for a role
If a role has default authorizations, then when an identity has this role, it will also inherit the role's default authorizations. This feature replaces the rights groups found in previous versions of the product.
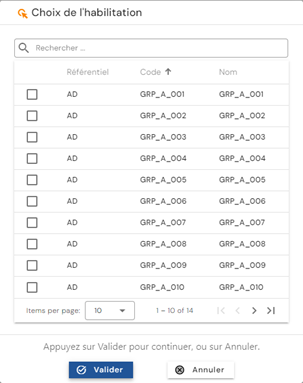
To add default authorizations to a role, open the desired role in view mode, then open the “Authorizations” tab. Click on the “” button.
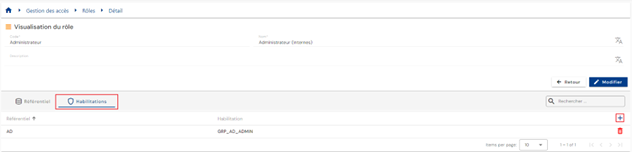
Select the desired rights and click on “Validate” to add the authorizations to the role or “Cancel” to cancel the operation.