Installation of the Mediation Controller server
Note
As a reminder, switching to root on Debian machines must be done with the following command:
1 | |
Downloading the mirror and necessary tools
The cyberelements Cleanroom 4.6 mirror and the Systancia repository signature key can be downloaded from this link (requires the creation of a client account): Systancia Marketplace
In addition to the mirror and key, third-party tools will be required for the upgrade process:
- An SSH client (on Windows, you can use PuTTY)
- An SCP client (on Windows, the WinSCP or FileZilla tools can be used)
Use the SSH client to connect remotely to your server.
Use the SCP client to transfer files to your remote machine.
Preparing for installation
Configuration of the network
It is essential to configure a static network address for the Mediation Controller. To do this, you first need to retrieve the name of your machine's network interface. Run the following command as root:
1 | |
This command displays the name of the network interface, its status, and the IP addresses assigned to the interface.
??? example “Example” After the command is executed, the following output is displayed:
1 2 3 4 5 | |
Once the network interface name has been obtained, it is now possible to edit the machine's network configuration.
Edit the /etc/network/interfaces file to modify it using the following template:
1 2 3 4 5 6 7 8 9 10 11 12 13 14 15 16 17 18 19 20 21 22 23 | |
Where:
INTERFACE_NAMEmust be replaced by the name of the network interface previously retrieved.IP_MED_WEBmust be replaced by the server's main IP address, which will be the IP address through which the web consoles can be accessed.NETMASKmust be replaced by the network mask associated with the IP address.NETWORK_GATEWAYmust be replaced by the default network gateway.IP_DNSmust be replaced by the IP address of the DNS server. If several servers need to be configured (3 maximum), separate them with a space.DNS_SUFFIXmust be replaced by the DNS suffix to be used. If no suffix needs to be entered, delete the line.IP_MED_SSLmust be replaced by the secondary IP address of the server. This will be the IP address through which the SSL Router will be accessible.
??? example “Example”
1 2 3 4 5 6 7 8 9 10 11 12 13 14 15 16 17 18 19 20 21 22 23 | |
The first is to install the resolvconf package so that the DNS configuration specified in the previous file can be applied:
1 | |
The second is to check the configuration of the /etc/hosts file with regard to the machine's primary IP address (IP_MED_WEB).
To do this, edit the /etc/hosts file and check that the second line is in the following format:
2 | |
??? example “Example”
If the machine is named MEDIATION-CONTROLLER without belonging to a domain and its IP address IP_MED_WEB is 10.0.10.10, then the file would be completed as follows:
1 2 3 4 5 6 7 8 9 | |
Attention!
An incorrect configuration of the file may cause an error when installing the collectd package.
Finally, all that remains is to restart the networking service in order to load the new network configuration:
1 | |
Configuring the APT package manager
Upload the files downloaded from the Systancia Marketplace to the /tmp/ directory on the server using an SCP client:
systancia.gpgcleanroom-4.6.1-build33.1096.D12-full.tgz
Log in to the server as root, then run the following commands to unzip the Systancia repository, configure its use in APT, and authenticate it.
1 2 3 4 5 | |
We strongly recommend disabling the installation of unnecessary packages when running apt commands. To do so, run the following command:
1 | |
Checking for the presence of the en_US.utf8 locale
Installing the Mediation Controller server requires the generation of en_US.utf8 locales.
To check whether they have already been generated on the server, run the following command as root:
1 | |
If the command response displays en_US.utf8 then proceed to the next step of the GRUB configuration.
Otherwise, run the following commands to add this locale to the machine:
1 2 | |
Configuring the GRUB boot program
Once these commands have been executed, you must restart the machine after applying a setting in the GRUB boot program:
1 2 3 | |
Installation of the cyberelements Cleanroom Mediation Controller server
Installation of basic components
Start installing the components using the following command as root:
1 | |
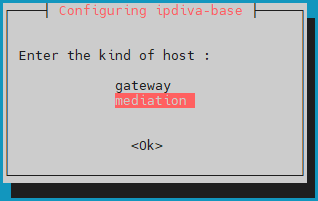
After downloading all dependencies, a window will open asking you to select the server type. Select mediation:
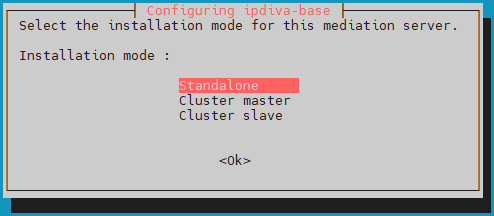
Then select the standalone installation mode:
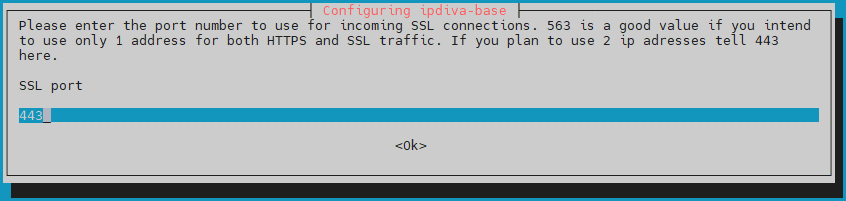
Then you will need to enter the port that the SSL Router will listen on. This listening port is usually set to 443 but the 8443 port can also be used if only one IP is used by the mediation server:
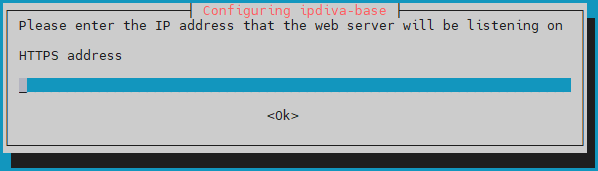
Then enter the web access address for the Mediation Controller server (corresponds to IP_MED_WEB in the network configuration):
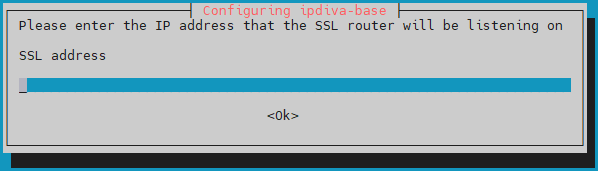
Finally, enter the IP address of the SSL router (corresponds to IP_MED_SSL in the network configuration):
What should I do if there is an error?
If there is an error in the information you entered, continue installing the ipdiva-base package and then use the following command to reconfigure the server:
1 | |
Installation of specific components
Start installing the components specific to the Mediation Controller server using the following command:
1 | |
The server must be restarted to complete the installation (use the reboot command).
Installation of drivers for connecting to Microsoft SQL Server databases
If you want to connect to an external database and it is a Microsoft SQL Server, then additional ODBC drivers must be installed.
Two versions are available: version 17 and version 18.
TLS connection required for drivers in version 18
Using ODBC 18 drivers requires that the connection be encrypted using TLS. To do this, you need to configure MS SQL Server for connection encryption.
Before starting the installation of ODBC drivers, you must install the necessary packages for preparation, then prepare the Microsoft repository for the package installation:
1 2 3 4 | |
Next, install the drivers according to the selected version and configure the system to use the sqlcmd command:
1 2 3 | |
1 2 3 | |
The ODBC drivers are now correctly installed.
If the Mediation Controller server has access to an MS SQL server, the following command should allow the connection to the remote server:
1 | |
Where:
SERVERshould be replaced with the DNS name or IP address of the MS SQL server.INSTANCE_NAMEshould be replaced with the name of the instance to connect to; if not necessary, also remove the \ character.PORTshould be replaced with the connection port to the MS SQL database instance.USERshould be replaced with the username for establishing the connection.
Examples
If the Mediation Controller server has access to an MS SQL database server via the IP address 10.0.10.100, the instance to be accessed is listening on the port 1433, and the access account is sql-user. Then the connection command is as follows:
1 | |
If the connection instance named MSSQLINSTANCE had to be specified, the command would be modified as follows:
1 | |
Configuration of an NTP time server
It is recommended to set up a time server to keep the system clock up to date. The necessary steps are described on the NTP configuration page.
Initial configurations on cyberelements Cleanroom
The Mediation Controller server components are installed. Now you need to configure the Mediation Controller.
-
Change the default passwords
Change the default passwords for the system consoles.
-
Installation of certificates and licenses
The Mediation Controller requires various certificates and a license to be operational.
-
Configuration of certification authorities
Add the certification authority (CA) or authorities that do not belong to Systancia and that will be used for Edge Gateway and HTML5 Gateway certificates.
-
Configure the Web certificate
Configure the web certificate used to connect to web interfaces
-
Declare a DNS name
Add a DNS name authorized to connect to web interfaces.
-
Configure the SSL virtual host
Configuration of the cyberelements Cleanroom SSL virtual host, which allows you to specify the connection address to the SSL router for clients and the Edge Gateway pairing mechanism.
-
Configure the organization
Configuration of the cyberelements Cleanroom organization.
-
Declare the Edge Gateways
Declare the Edge Gateways or HTML5 Gateways to be installed and generate a pairing token.
-
Create a logical site
Create and configure a logical site that groups together Edge Gateways and HTML5 Gateways that can access local resources.
-
Install an Edge Gateway
Install and configure a new Edge Gateway with the newly installed Mediation Controller server.
An HTML5 Gateway instance will also be configured.