Configuring steps, actions, and tasks
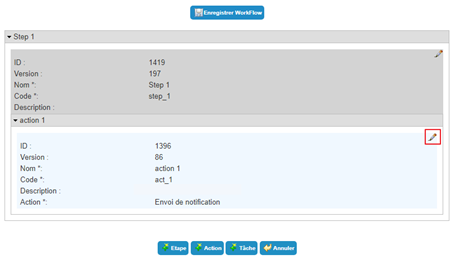
A workflow consists of one or more steps, each of which consists of one or more actions and/or tasks.
Steps are executed sequentially in the workflow, while actions and tasks within the same step are executed in parallel.
Configure a step
You can create or modify a step in a workflow when the workflow form is open in edit mode.
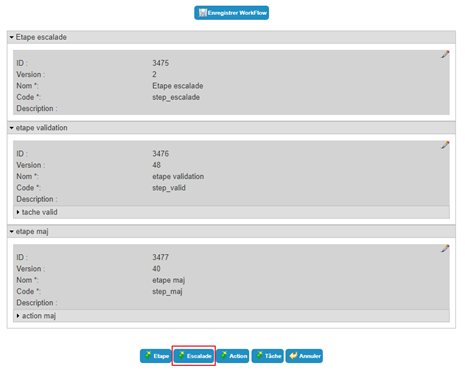
To create a new step, edit a workflow and click on the “Step” button.
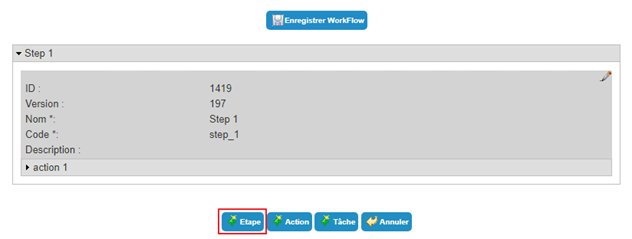
To modify a step, click on the “ ” icon located under the desired step.

To delete a step, open the step in edit mode (see above) and click on the “Delete” button.
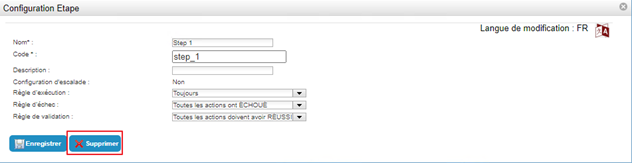
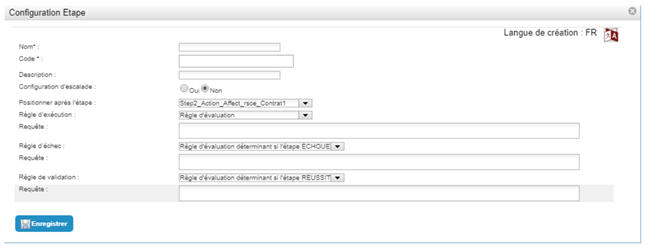
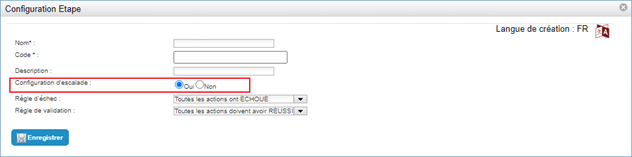
Parameters of a workflow step
| Parameter | Description | Type and possible values |
|---|---|---|
| Language of creation/modification |
If necessary, add a translation by clicking on the icon  . .
|
Character string. |
| Name |
Step name. You can customize the name with a value specific to the workflow instance by including a keyword. |
Required. Character string that can contain keywords. In this case, the character string must not contain any spaces or special characters. Example of a name with a keyword: Validate_Request_#TARGET#ATTRIBUTE#displayname# |
| Code | Identifier for the step, which must be unique across all steps in all templates. |
Mandatory. Character string, without spaces or special characters. |
| Description | Description of the step | Character string. |
| Escalation configuration | Parameter indicating whether the step is a standard or an escalation step. |
Yes/No. Default value = No. |
| Position after step | Parameter used to position steps relative to each other (defines the sequence of steps). |
Visible from the creation of the second step. List of existing steps. |
| Execution rules | Parameter used to specify the conditions for executing a step. |
|
| Query | Parameter used to define an SQL query to check the status of actions, steps, or any other object accessible by keyword. |
Visible if “Validation rule” = “Evaluation rule”. Character string: SQL query used to extract the elements that will determine whether or not a step will be executed. The query must return a Boolean value. If the value returned is 1, the step will be executed; otherwise, it will not. |
| Failure rule |
Parameter used to indicate the conditions that cause the step to fail. Note: The failure rule takes precedence over the validation rule. |
|
| Query | Parameter used to define an SQL query to check the status of actions, steps, or any other object accessible by keyword. |
Visible if “Validation rule” = “Evaluation rule determining whether the step fails.” Character string: SQL query used to extract the elements that will determine whether a step will be in the "Failed" or “Successful” state. The query must return a Boolean value. If the returned value is 1, the step will be in the “Successful” state; otherwise, it will be in the “Validated” state. |
| Validation rule |
Parameter used to indicate the conditions under which the step is successful. Note: The failure rule takes precedence over the validation rule. |
|
| Query | Parameter used to define an SQL query to check the status of actions, steps, or any other object accessible by keyword. |
Visible if “Validation rule” = “Evaluation rule determining whether the step is successful.” Character string: : SQL query used to extract the elements that will determine whether a step will be in the "Successful" or “Failed” state. The query must return a Boolean value. If the returned value is 1, the step will be in the “Successful” state; otherwise, it will be in the “Failed” state. |
In each step, you must define at least one action or task.
Configure an escalation step
Escalation is a step that runs after a certain period of inactivity following the launch of the workflow, the start of a step, or the start of an action.
Escalation example:
Users can request access rights to the MyApp application. This workflow requires an initial validation step by the direct manager before granting the right. If, one week after the request for rights, the direct manager has still not validated the request, the escalation step triggers:
- The cancellation of the validation step by the direct manager,
- The sending of a notification to the requester,
- The sending of a validation request to the MonApp application manager.
Once the escalation step has been successfully completed, the workflow will execute the next step of assigning the right.
An escalation step cannot be the first step in a workflow.
Configuring an escalation step follows the same process as creating a step, except that you must check the “Escalation configuration” option to “Yes”.
Save the creation form by clicking the “Save” button.
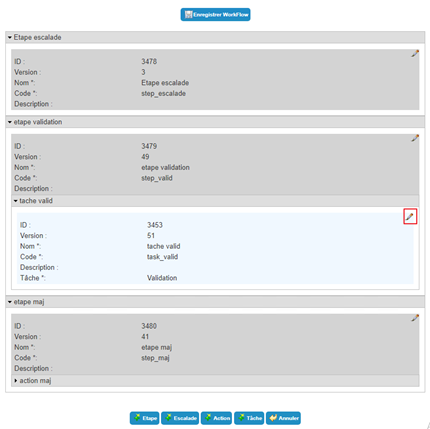
You must then create the desired escalation. To do this, click on the “Escalation” button.
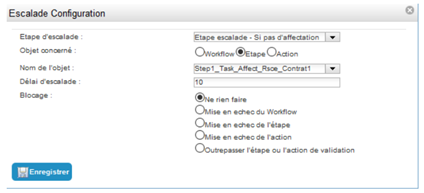
Escalation step settings:
| Parameter | Description | Type and possible values |
|---|---|---|
| Escalation step | Step on which to configure escalation. | List of configured steps for which the “Escalation configuration” option is checked. |
| Object concerned | Type of object on which the inactivity timeout will be considered to activate the escalation step. |
|
| Name of the object | Object on which the inactivity timeout will be considered to activate the escalation step if the object concerned is not the workflow. | List of steps and actions already configured for this workflow. |
| Escalation timeout |
Timeout (in days) between:
|
Integer (number of days). |
| Block | Action to be performed on the workflow, step, or action in progress when the inactivity time is exceeded and the escalation step is started. |
|
After creating and configuring an escalation step, you can add tasks and/or actions to it.
To modify an escalation, access depends on the object on which the escalation is positioned:
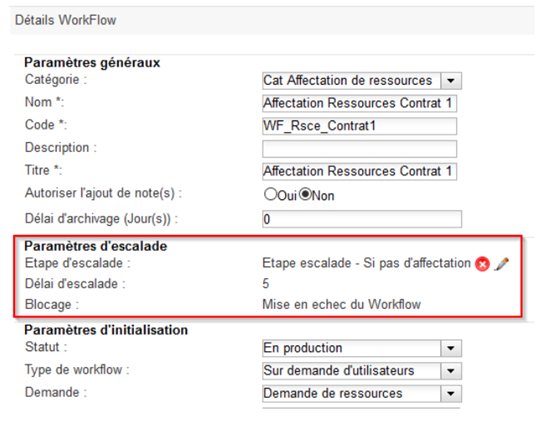
To modify an escalation configured on the workflow, click on the “” icon located in the escalation settings in the general workflow settings.
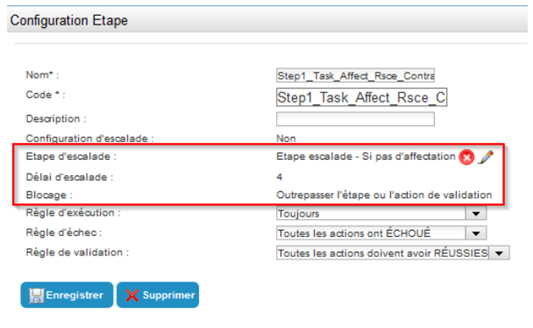
To modify an escalation configured on a step, click on the “” icon located in the escalation settings for the step in question.
To modify an escalation configured on an action, click on the “” icon located in the escalation settings for the action in question.
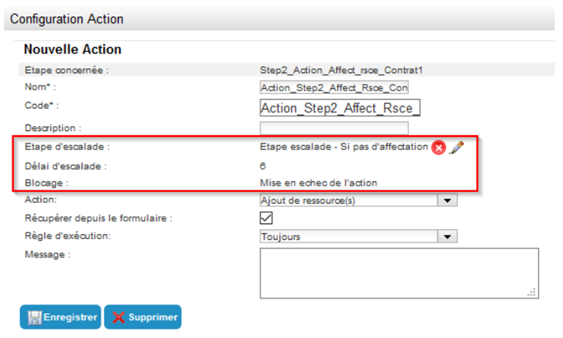
In all cases, only the “Archiving delay” and “Blocking” fields can be modified.
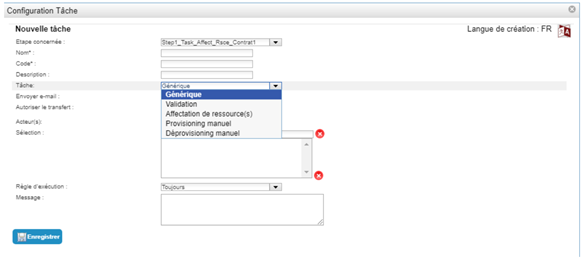
Configuring a task
A workflow consists of one or more steps, each of which consists of one or more actions and/or tasks.
A task is a manual operation requiring user intervention.
As long as a task is not completed, the workflow is blocked and remains pending.
There are several different types of tasks:
- Generic,
- Validation,
- Manual provisioning,
- Manual deprovisioning.
To create a new task, click on the “Task” button.
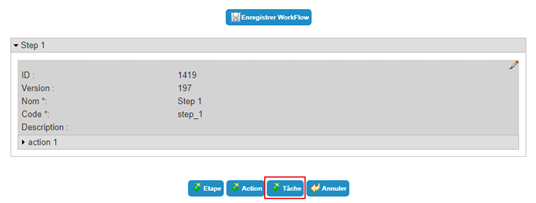
To modify a task, click on the icon “” located under the desired step.
To delete a task, open the task in edit mode (see above) and click on the “Delete” button.
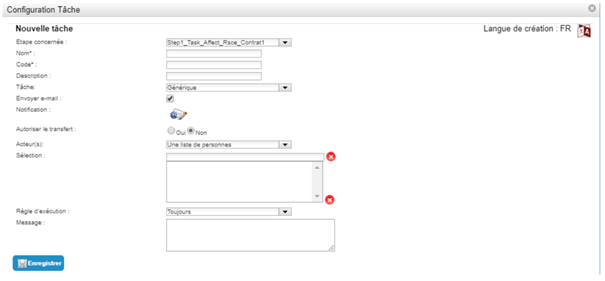
Parameters of a Workflow task
| Parameter | Description | Type and possible values |
|---|---|---|
| Language of creation/modification |
If necessary, add a translation by clicking on .
|
Character strings. |
| Step concerned | Task affiliation step. | List of existing steps. |
| Name | Name of the task. | Character string. |
| Code | ID of the task that must be unique among all tasks of all workflow templates. | Character string without spaces or special characters. |
| Description | Description of the task. | Character string. |
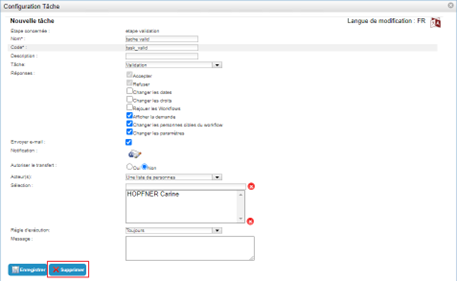
| Task |
Parameter indicating the type of the task. The rest of this form is adapted according to the selected task. |
|
| Send e-mail | Parameter allowing to configure the notification to send. | Checked/unchecked. |
| Notification |
To configure a notification action, click on  . .
|
Visible if “Send email” is checked. Refer to the chapter Configure a notification. |
| Authorize the transfer |
Adds a “Transfer action to” field to the validation form in each workflow instance. The validator can then choose a person to whom to transfer the validation action or task. The task will no longer appear in his list and he will not be able to validate it. |
Yes/No. |
| Actor(s) | Selection method of the persons who must validate or refuse the task. |
|
| Selection | List resulting from the selection of persons made during configuration. |
Visible if “Actor(s)” = “A list of persons”. List of persons to select. 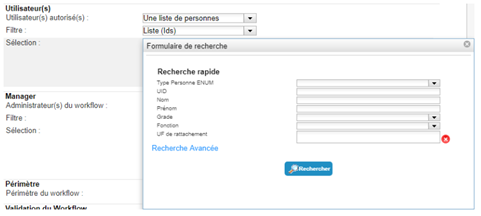
|
| Query | Parameter allowing you to specify an SQL query to filter the desired persons. |
Visible if “Actor(s)” = “A list of persons returned by an SQL evaluation.” Character string: SQL query used to filter the desired persons. 
|
| Execution rule |
Parameter used to specify the conditions for executing a task. For example, a task could be executed or not depending on:
|
|
| Query | Parameter used to define an SQL query to check the status of actions, steps, or any other object accessible by keyword. |
Visible if “Execution rule” = “Evaluation rule”. Character string: SQL query used to extract the elements that will determine whether or not a task will be executed. The query must return a Boolean value. If the value returned is 1, the task will be executed; otherwise, it will not. |
| Message | Free field allowing to set a message to be displayed in the Workflow user interface. |
Character string that may contain keywords. Example: Please validate the creation of the service provider: #TARGET#ATTRIBUTE#name# #TARGET#ATTRIBUTE#firstname# |
Parameters specific to the generic task
A generic task simply allows you to confirm or reject the execution of an operation. It does not have any particular parameters.
The confirmation of the execution of the task will concern all the recipients (targets).
Parameters specific to a validation task
The validation task allows an administrator to validate or refuse a request for rights or attribute modifications.
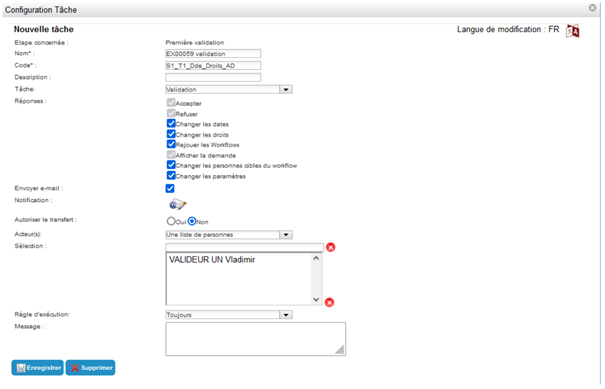
| Parameter | Description | Type and possible values |
|---|---|---|
| Answers |
Response and action that can be performed by the validator. Depending on the options checked in the response, the validation form will differ in workflow instances. |
|
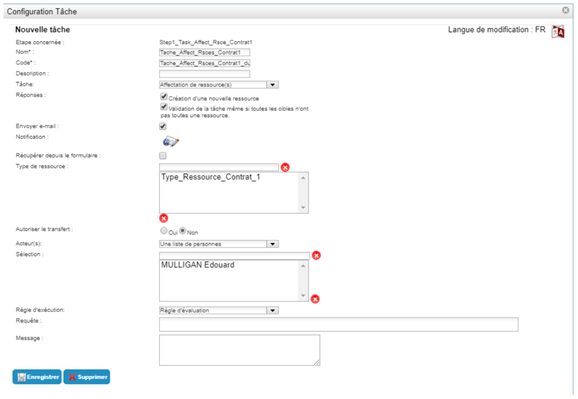
Parameters specific to a task assigning resource(s)
A resource assignment task is used in a resource request workflow or in an event-based workflow. It allows the operator to assign/create a resource for the target(s) directly in the workflow interface without going through the identity records.
Any permissions in the operator's administration profile do not apply: He can assign/create the resources according to the workflow settings.
Note: A resource assignment task must be followed by a step with a resource assignment action, otherwise the resource will not be associated with the target.
| Parameter | Description | Type and possible values |
|---|---|---|
| Answers | Options on the resource assignment form. |
|
| Resource type | Allows to select the types of resources to assign. |
Type of resource to select. Warning: even though the interface allows you to add several types of resources, it is essential to enter only one for the solution to work properly. |
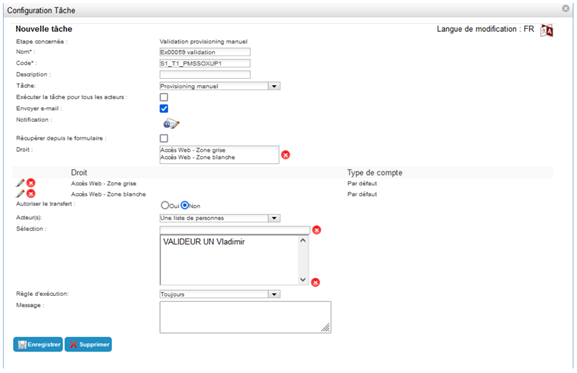
Parameters specific to manual provisioning and manual deprovisioning tasks
A manual provisioning task is used in a provisioning request workflow or in an event-driven workflow. This type of provisioning is used when automatic connector provisioning is not possible, but you still want to track the actual creation of accounts and authorizations in the application repository.
It tells the operator which rights and accounts to create or give to one or more users. Once they have performed the operations on the accounts in the repository, they confirm the creation/assignment of rights in the Systancia Identity workflow form. The provisioning statuses of the various rights are then updated in Systancia Identity (changing from red to green) without any further action being required.
The theoretical account is created by the provisioning task if it does not yet exist when the task is executed.
The manual deprovisioning task updates the provisioning status of the right (from green to red).
| Parameter | Description | Type and possible values |
|---|---|---|
| Execute the task for all actors | Option to group the task into a single request even if there are multiple actors, or to perform as many instances of the task as there are actors. |
Checked/unchecked.
|
| Retrieve from events |
Applies to “Rights Request” workflows. The manual provisioning task only provisions rights that are requested in the rights request form AND whose repository provisioning type is “Manual”. |
Checked/unchecked.
|
| Right | List of rights that can be manually provisioned/deprovisioned in the task validation form. |
Visible if the “Retrieve from events” option is unchecked. List of rights. |
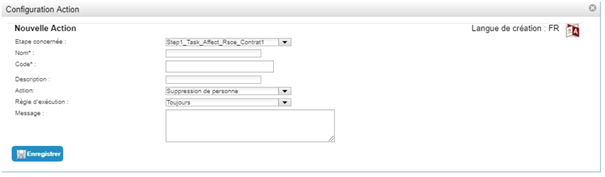
Configuring an action
A workflow consists of one or more steps, each of which consists of one or more actions and/or tasks.
A task is an operation that is performed automatically without manual interaction from a user.
There are several different types of actions:
- Sending a notification,
- Running an external process,
- Updating person information,
- Adding rights,
- Removing rights,
- Deleting a person.
To create a new action, click on the “Action” button.

To modify an action, click on the “” icon located under the desired action.
To delete an action, open it in edit mode (see above) and then click on the “Delete” button.

Parameters of a workflow action
| Parameter | Description | Type and possible values |
|---|---|---|
| Language of creation/modification |
If necessary, add a translation by clicking on .
|
Character strings. |
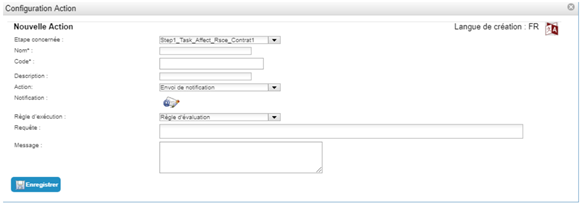
| Step concerned | Ownership step of the action. | List of existing steps. |
| Name | Name of the action. | Character string. |
| Code | ID of the action that must be unique among all actions of all workflow templates. | Character string without spaces or special characters. |
| Description | Description of the action. | Character string. |
| Action |
Parameter indicating the type of action. The rest of this form adapts according to the selected action. |
|
| Execution rule |
Parameter used to specify the conditions for executing the action. For example, a task could be executed or not depending on:
|
|
| Query | Parameter used to define an SQL query to check the status of actions, steps, or any other object accessible by keyword. |
Visible if “Execution rule” = “Evaluation rule”. Character string: SQL query used to extract the elements that will determine whether or not a action will be executed. The query must return a Boolean value. If the value returned is 1, the action will be executed; otherwise, it will not. |
| Message | Free field allowing to set a message to be displayed in the Workflow user interface. |
Character string that may contain keywords. Example: Please validate the creation of the service provider: #TARGET#ATTRIBUTE#name# #TARGET#ATTRIBUTE#firstname# |
Action settings “Send notification”
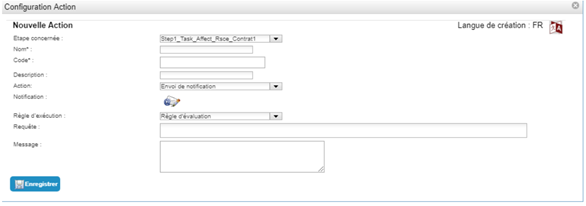
To configure a notification action, click on the icon “ ”. See the section Configure a notification.
Action settings “Process execution”
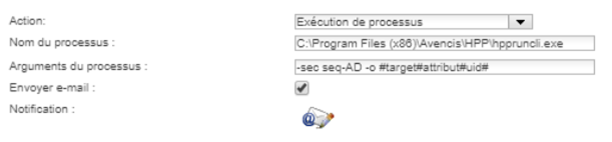
| Parameter | Description | Type and possible values |
|---|---|---|
| Name of the process | Parameter allowing to specify the path of the process to execute. |
Character string. Example: C:\Program Files (x86)\Avencis\HPP\hppruncli.exe |
| Arguments of the process | Parameter allowing to specify the arguments to pass to the process to execute. |
Character string that may contain keywords. Example: -sec seq-AD -o #target#attribute#uid# |
| Send e-mail | Parameter allowing to specify if a notification must be sent in case of failure of the process. | Checked/unchecked. |
| Notification |
To configure a notification, click on the icon “”.
|
Visible if “Send email” is checked. See the section Configure a notification. |
Action settings “Update person information”
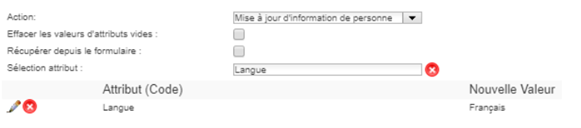
| Parameter | Description | Type and possible values |
|---|---|---|
| Delete empty attribute values | Deletes attribute values from the target person's record for which no values are entered in the workflow form. |
Checked/Unchecked. This setting can only be applied if there is only one target person. |
| Retrieve from the form | Allows you to specify whether the attributes to be assigned to targets come from user entries as part of a user request workflow. |
Checked/Unchecked. This setting can only be applied if the workflow type is “On user request”. |
| Attribute selection | Parameter allowing to configure a list of attributes and their values to update during the execution of the action. | Attribute list. |
Action settings “Add rights” and “Remove rights”
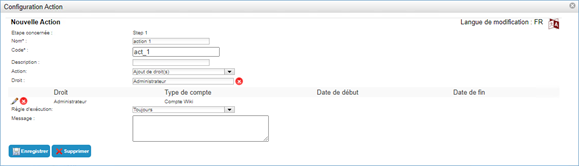
| Parameter | Description | Type and possible values |
|---|---|---|
| Retrieve from the form | Allows you to specify whether the rights to be assigned to targets originate from user entries as part of a user request workflow. |
Checked/Unchecked. Setting only available if the workflow type is “On user request”. |
| Right | Parameter used to configure a list of rights to add/remove from the targets of the action. | List of rights. |
Action settings “Delete person”
The delete person action does not have any specific parameters. It simply deletes the person for whom the workflow was triggered.
This action is used with a “delayed trigger” workflow, which is triggered based on its end date, for example.
Action settings “Add resource(s)”

| Parameter | Description | Type and possible values |
|---|---|---|
| Retrieve from the form | Allows you to specify whether the types of resources to be assigned to targets come from user entries in a user request workflow. |
Checked/Unchecked. Setting only available if the workflow type is “On user request”. |
| Resource type |
Parameter for configuring a list of resource types that will be assigned to targets. The first available resource will be assigned automatically. If no resources are available, the action will fail. |
List of resource types. Only available if the “Retrieve from form” box is unchecked. Warning: even though the interface allows you to add multiple resource types, it is essential to enter only one for the solution to work properly. |
Configure a notification
Configuring notifications involves defining the emails that will be sent, namely:
- The recipient(s)
- The subject
- The body of the email
- Etc.
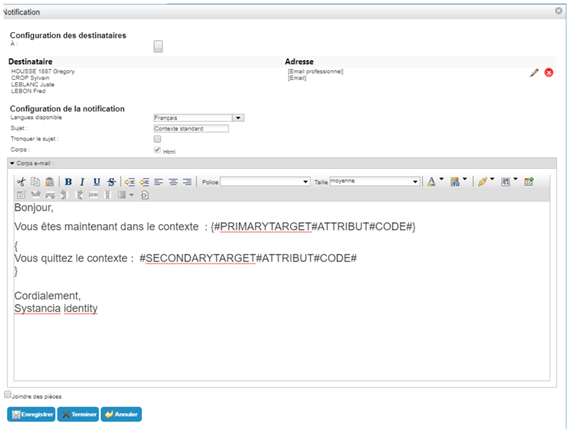
Configuration of the recipients
| Parameter | Description | Type and possible values |
|---|---|---|
To: 
|
Parameter allowing to configure the list of recipients. |
Choosing how to configure the recipient.

If the “SQL evaluation returning a list of persons” option is selected:
To configure an attribute as an email type, create a string attribute, then in the “Display format” section, select the “Link display format” and then the 'MAIL' prefix. 
|
Notification configuration
| Parameter | Description | Type and possible values |
|---|---|---|
| Available languages |
It is possible to send notifications in different languages by saving the subject and body for each language. The notification will be sent in the user's language as defined in their language attribute. If this is not defined, it will be sent in the default language. |
List of languages configured in cyberelements Identity. |
| Subject |
Subject of the e-mail. This parameter can contain keywords. It can be written in any supported language. |
Character string that may contain keywords. |
| Cut the subject | Parameter allowing to limit the length of the subject by displaying the values of the keywords of the first target only if this one is multiple. |
Yes (box checked). No (box unchecked). |
| Body | Parameter allowing to specify that the mail body is in HTML. Parameter with fixed value. | Yes (always checked). |
| E-mail body |
Parameter containing the HTML body to be sent. This parameter uses keywords to display mainly information about the target(s) and the requester. It can be written in any supported language. |
Character string that may contain keywords. Keywords must be enclosed in curly brackets {} to be evaluated by the workflow engine. An email body can contain several sets of curly brackets corresponding to distinct groups of text to be evaluated. A set of curly brackets will be evaluated and duplicated as many times as there are targets in the workflow. Character strings outside the curly brackets are considered constants and will only be injected once into the resulting email body. |
“Attach files” option
| Parameter | Description | Type and possible values |
|---|---|---|
| Attach documents |
Parameter used to indicate that one or more attachments must be included with the notification. Attachments may contain cyberelements Identity reports (csv, PDF) and/or files to be searched for on the server or network. |
Yes (checkbox checked).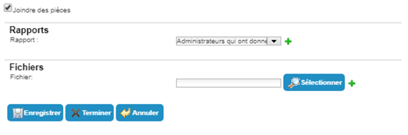 No (checkbox unchecked). |
| Report | Parameter allowing to select the report(s) to attach. |
Visible if “Attach files” is checked. List of reports available in cyberelements Identity. |
| File | Parameter allowing to specify the file(s) to attach. |
Visible if “Attach files” is checked. File to select. |
Validation of a workflow from an email
When a workflow has a validation step or task, it is possible to include a link in the notification that will automatically accept or reject the validation.
Refer to the Keyword Management in Workflows page for information on using keywords.
Keywords reserved for the body of the email
The use of keywords in the body of an email is subject to a specific syntax defined in workflow keywords.
To send emails, the SMTP server must be configured in the Configuration / General / Preferences / Application Settings menu.
Note: Avoid copying and pasting into the body of the email, as this may include inappropriate HTML tags. Formulas and keywords may be misinterpreted.